
 Welcome to the tutorial on SAP Infotype change log. This tutorial is part of our free SAP HCM training. One of the key requirements from any HR software is the ability to secure sensitive data. While this is achieved through the implementation of a well-designed authorization matrix, it is also imperative that one should be able to track what changes have been made to sensitive data and which user has made these changes. This is particularly necessary, for example, if data has been erroneously maintained or some important data has been deleted.
An important consideration here is which HR data should be qualified as “sensitive”. This needs to be done judiciously so that changes made to sensitive data can be analysed without burdening the database by creating unnecessary change documents.
The decision about which infotypes require logging should ideally be made by the HR business process owners. Usually, all data relevant to payroll and time management must be logged, as changes to this data is highly consequential. In addition, based on individual organizational requirements and policies, additional infotypes may be logged.
Activation of Infotypes for Logging
In order to be able to track changes made to infotypes, we must first activate logging of these changes. This must be done at the infotype level, and within an infotype at the field level. Simply put, we should specify the infotypes for which changes should be logged, and the specific fields within these infotypes that must be logged.
To do this, use transaction code SPRO and follow the IMG path mentioned below as well as depicted in Figure 1:
Personnel management – Personnel administration – Tools – Revision – Set up change document

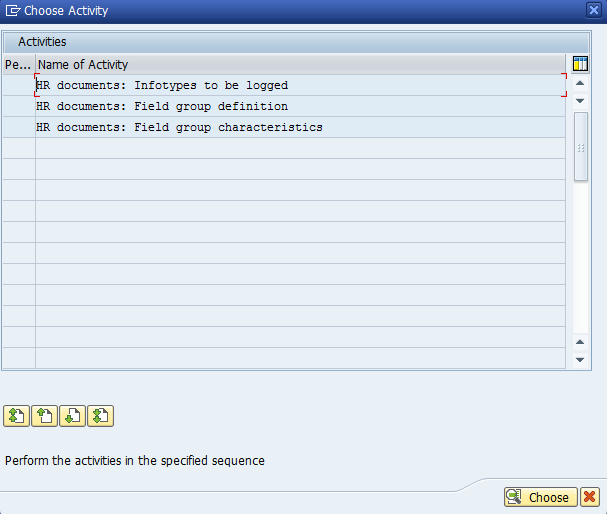
Executing the ‘Set up Change document’ activity takes you to the screen shown in Figure 2.
Infotypes to be Logged
Double click on the first activity ‘HR documents: Infotypes to be logged’. This will take you to the configuration table shown in Figure 3. Here we need to enter the infotypes that should be automatically logged whenever there is a change made. This change could be the creation of a new record, deletion of a record, changing field contents, etc.
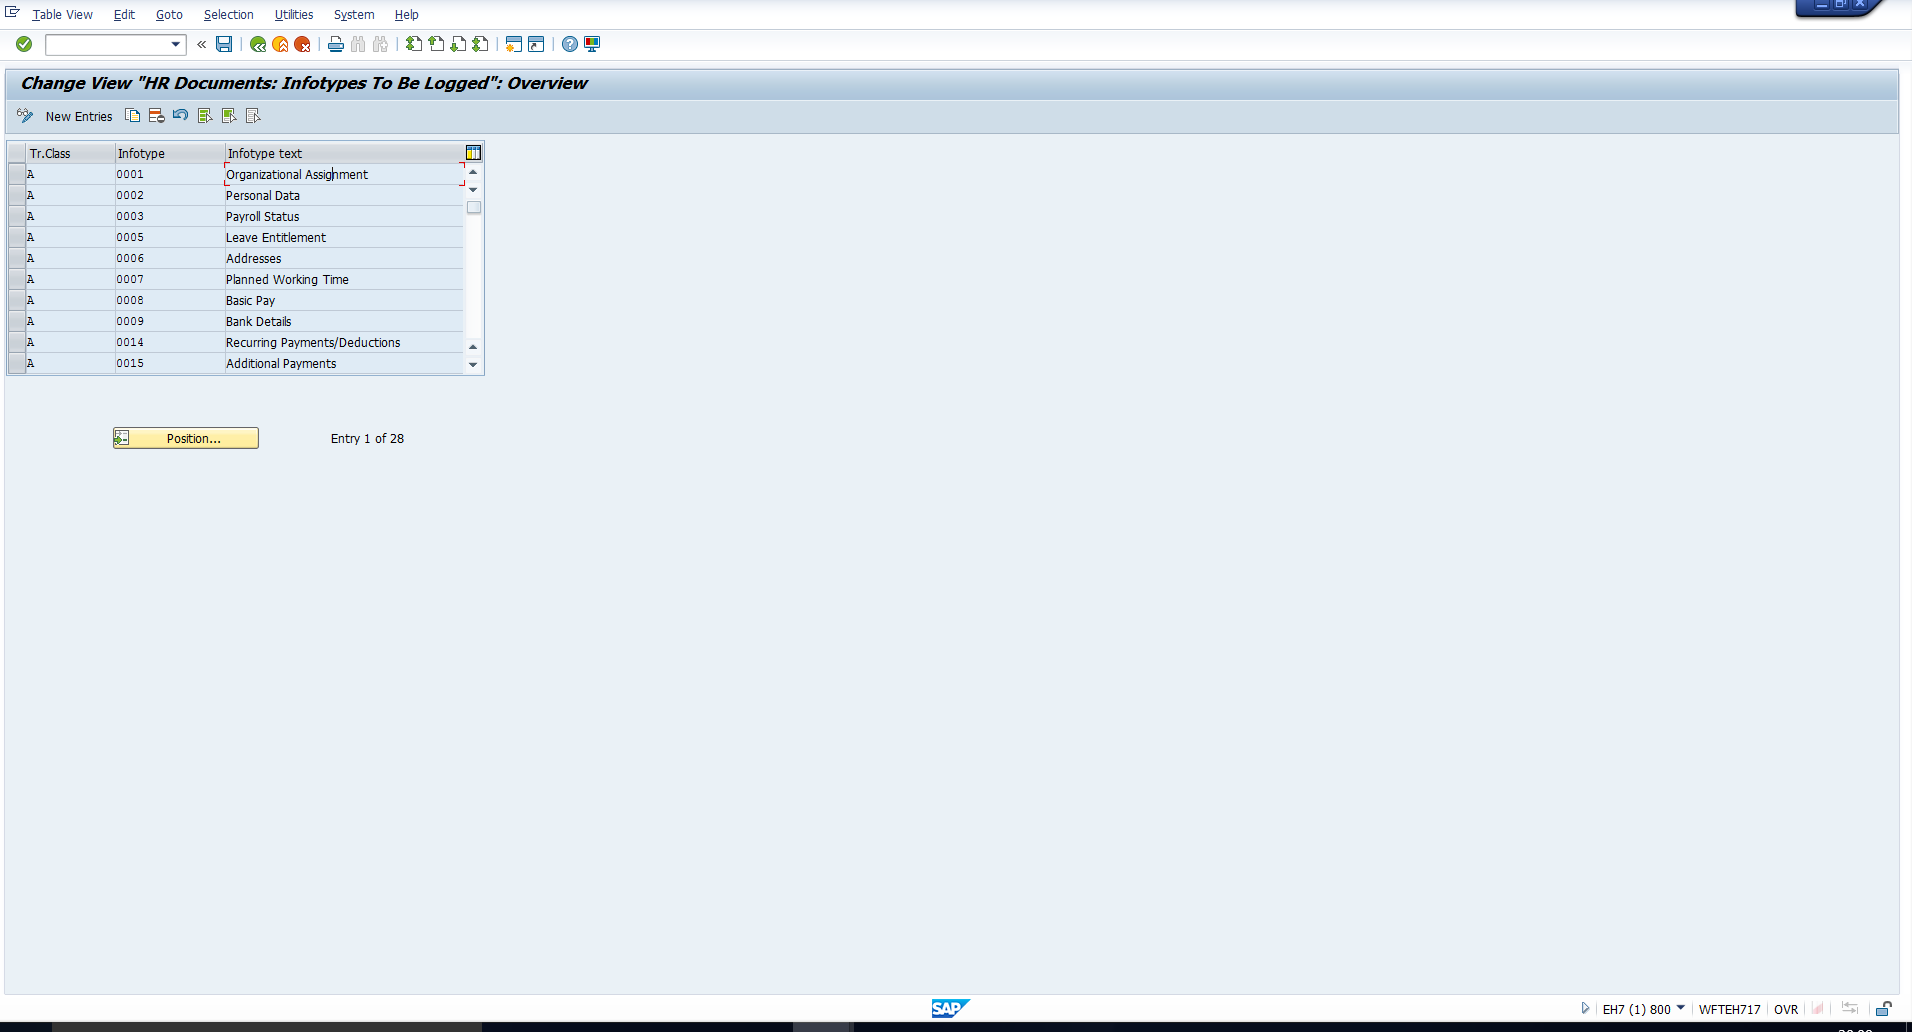
In the above table, you can see the list of infotypes that have been activated for changes to be logged. Please note that if you need to track changes for an infotype for which there is no entry in this table, you should create a new entry for that infotype. For each new entry that you create, mention the Transaction Class as A, as this indicates HR master data, whereas Transaction Class B is used to indicate Applicant data.
Field Group Definition
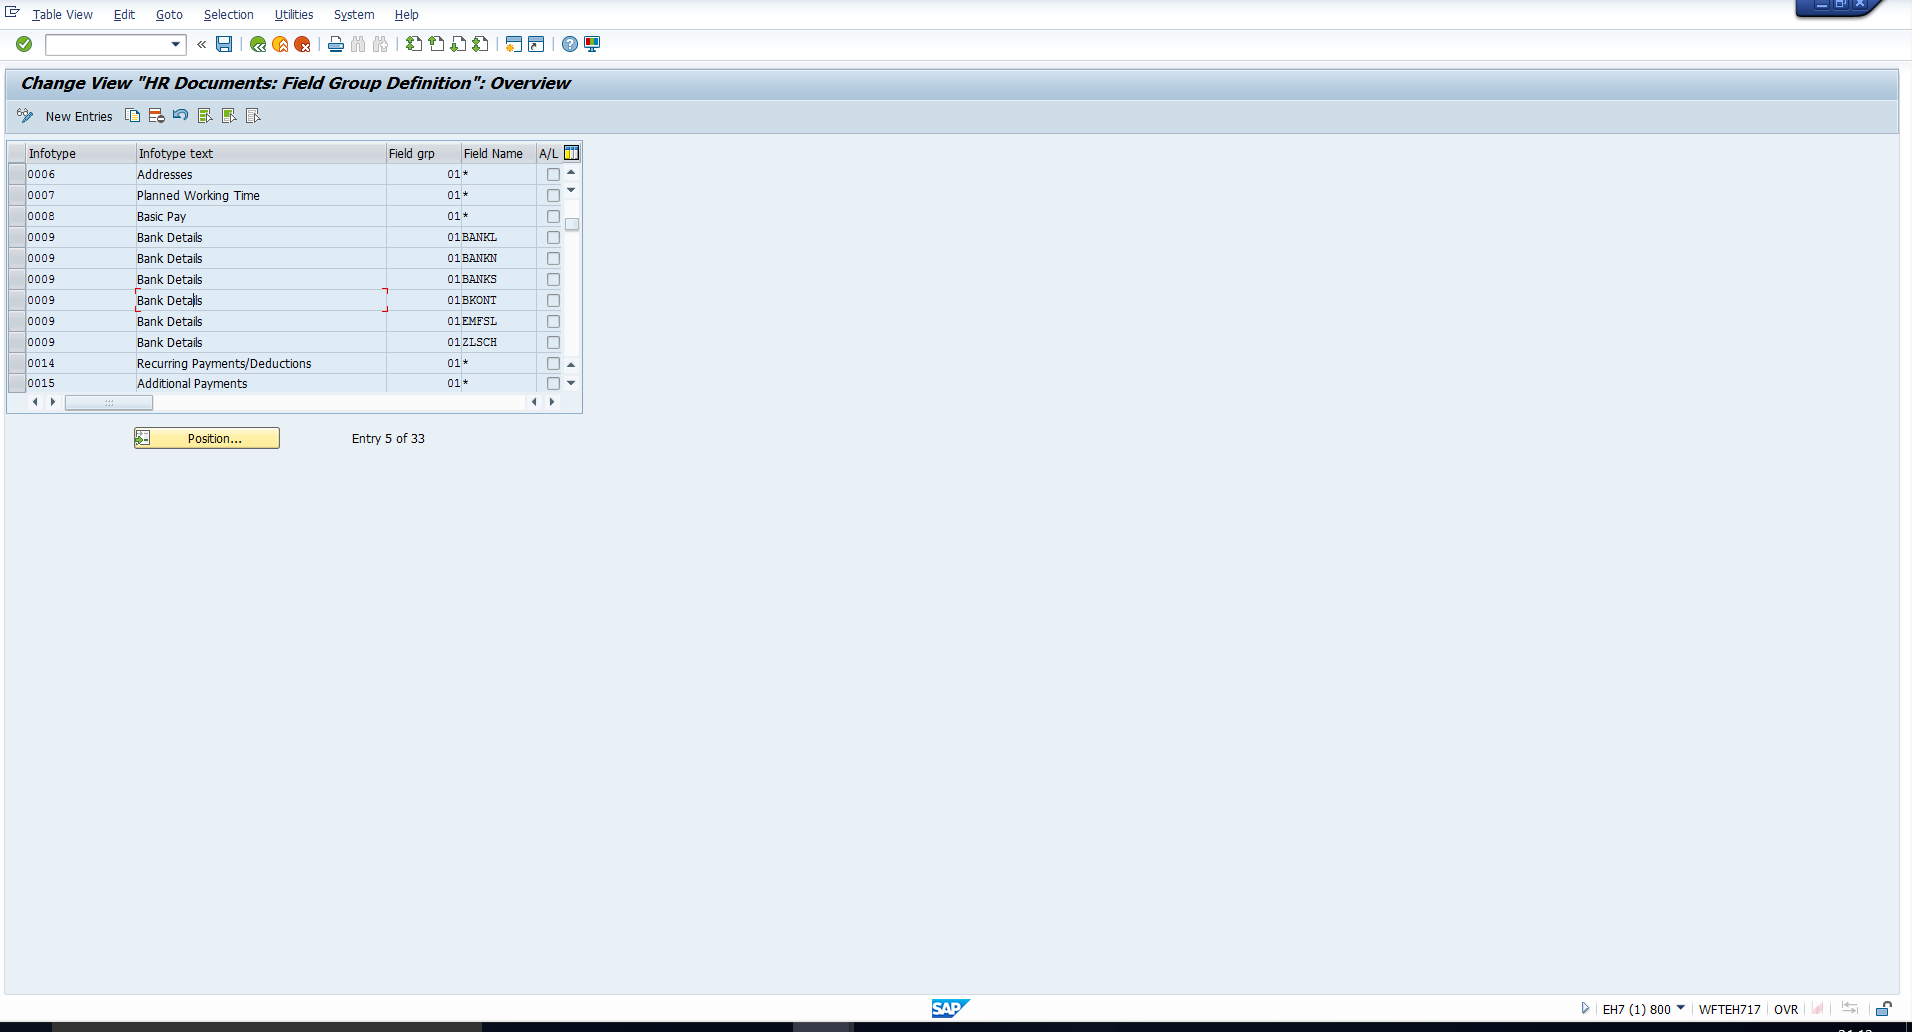
Next, once the infotypes have been added, you need to list out the fields in these infotypes that need to be logged. To do this, double click on the second activity ‘HR documents: Field group definition’ in Figure 2. This will take you to the screen depicted in Figure 4.
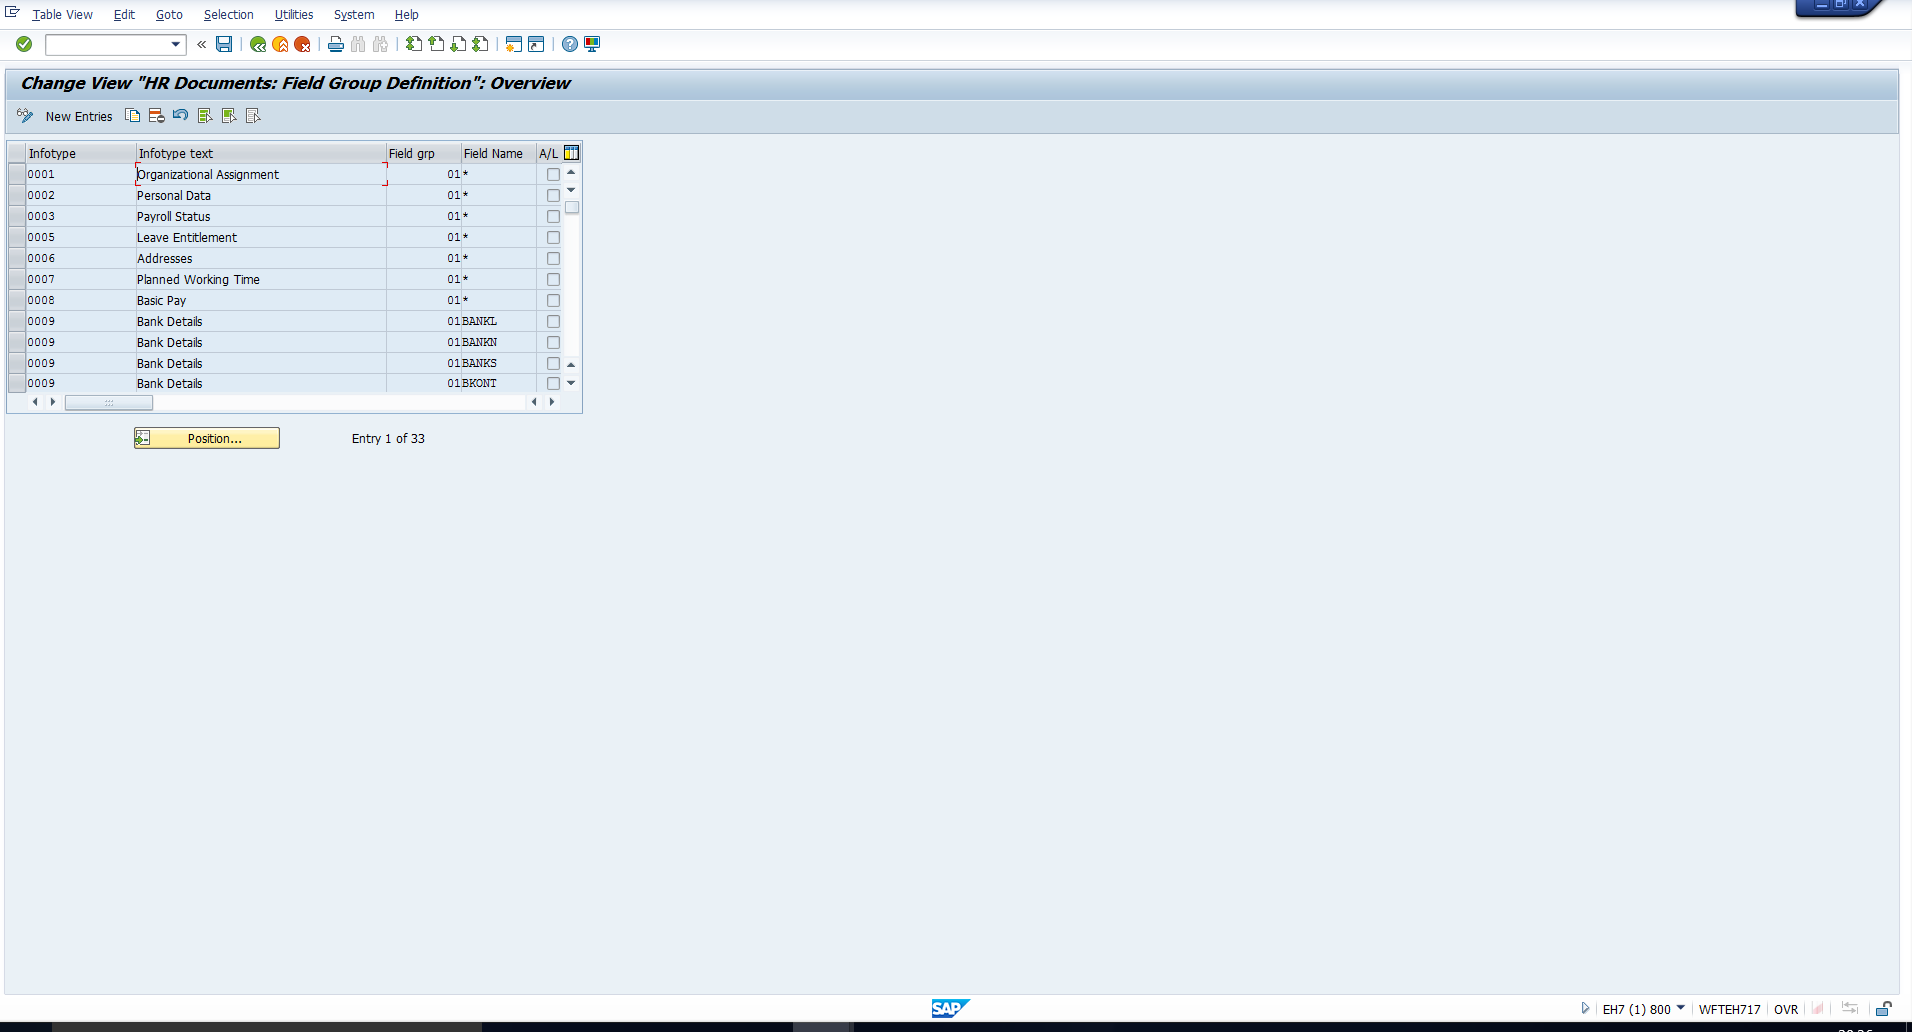
Here you can group the fields that must be logged into Field groups. For the change document, all fields in a field group, within an infotype, are treated as one unit and logged together.
If you look at the entries in the above table, there are some infotypes for which all the fields should be logged. These are the infotypes for which an asterisk (*) has been specified in the column ‘Field name’. For example, in the above screenshot, you can see that all the fields should be logged for the below mentioned infotypes:
- 0001 (Organizational assignment)
- 0002 (Personal data)
- 0003 (Payroll Status)
- 0005 (Leave Entitlement)
- 0006 (Addresses)
- 0007 (Planned Working Time)
- 0008 (Basic Pay)
If you want to log only certain fields, then the required field name must be specified in this column. Create a new table entry for each field that must be logged. You can check the settings for Infotype 0009 (Bank details) as shown in Figure 5.
Field Group Characteristics
Double click on the next activity ‘HR Documents: Field Group Characteristics’ to specify the type of change documents that must be created while logging the infotype. This will take you to the screen in Figure 6.
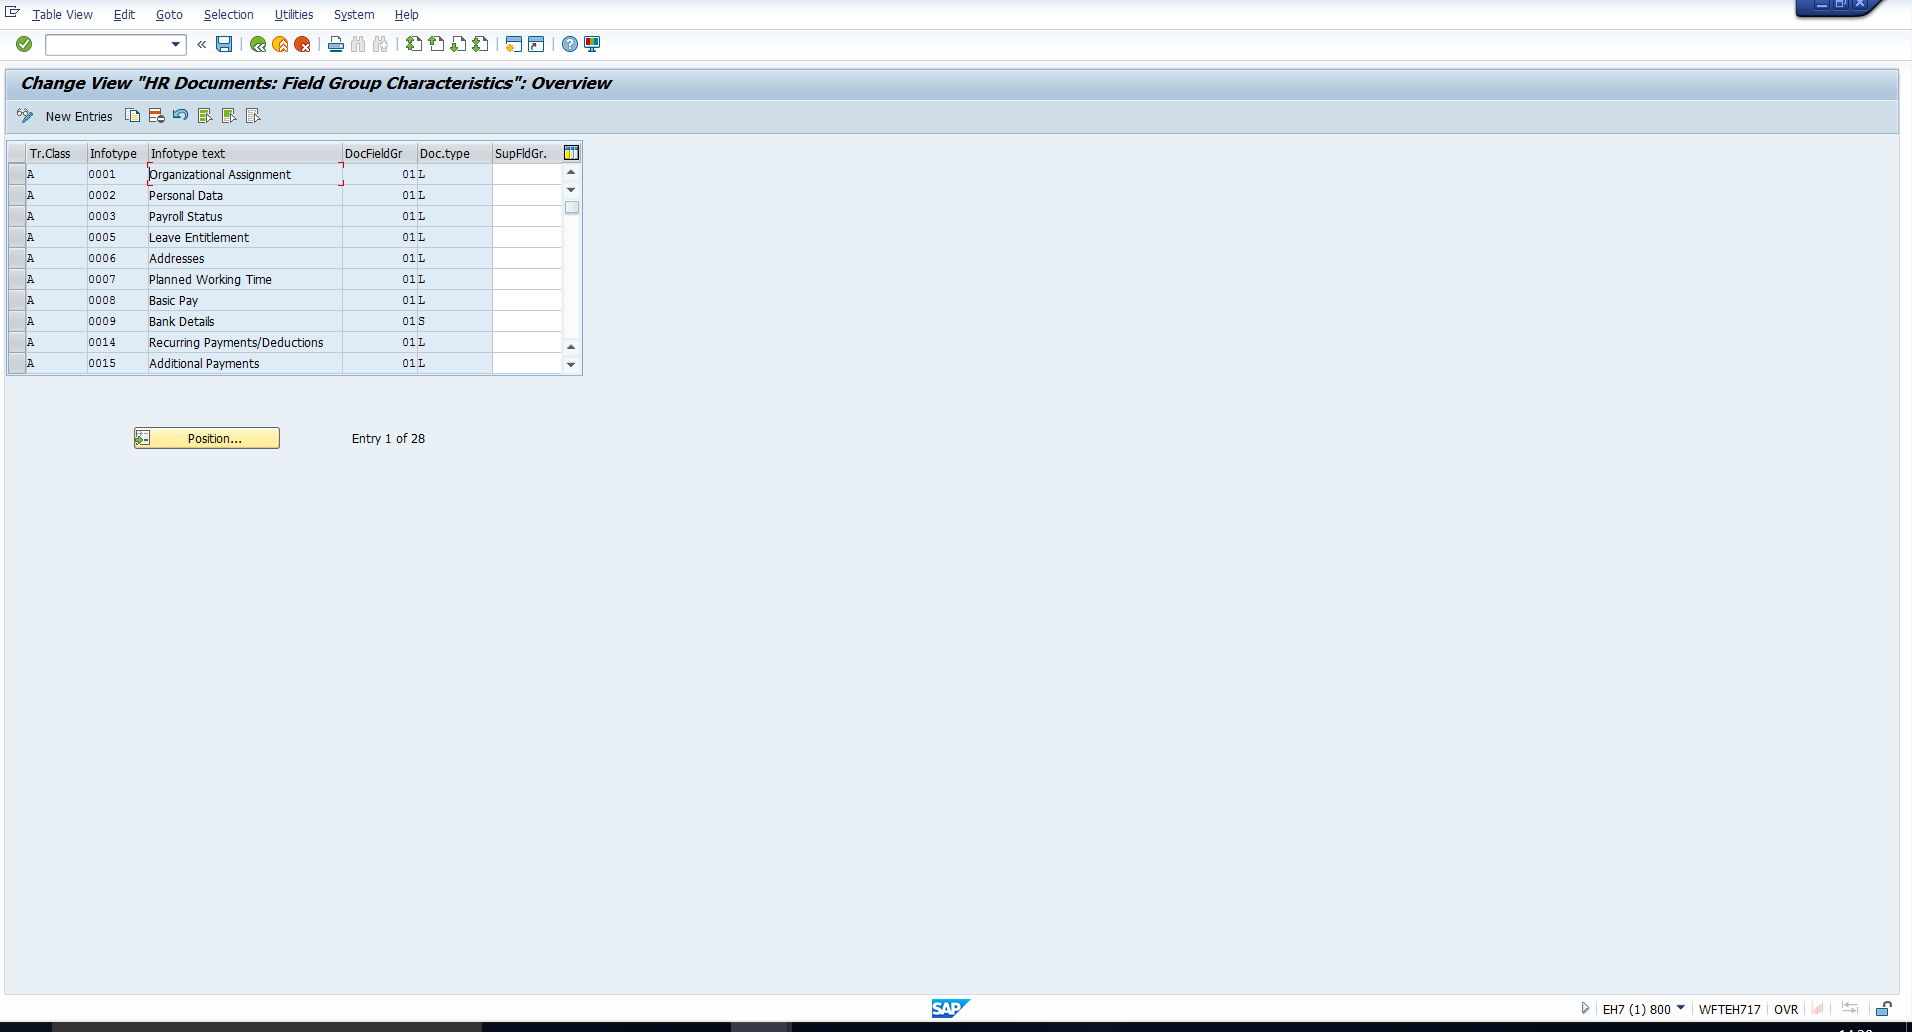
In this table, for each infotype and field group, a document type must be specified. There are two types of change documents:
- Long-term documents (L) are sorted by Personnel number and infotype. This type of document is useful to find out which user made what changes to which infotype and when. If this is your requirement, then assign the value ‘L’ in this table to the required infotype and field group.
- Short-term document (S) are sorted by the ‘last changed on’ date and time. The main practical use of these documents would be if there is an interface between SAP and an external system, wherein short-term data changes must be extracted and sent to the external system. If this is your requirement, then assign the value ‘S’ in this table for the required infotype and field group.
Report to Extract SAP Infotype Change Log
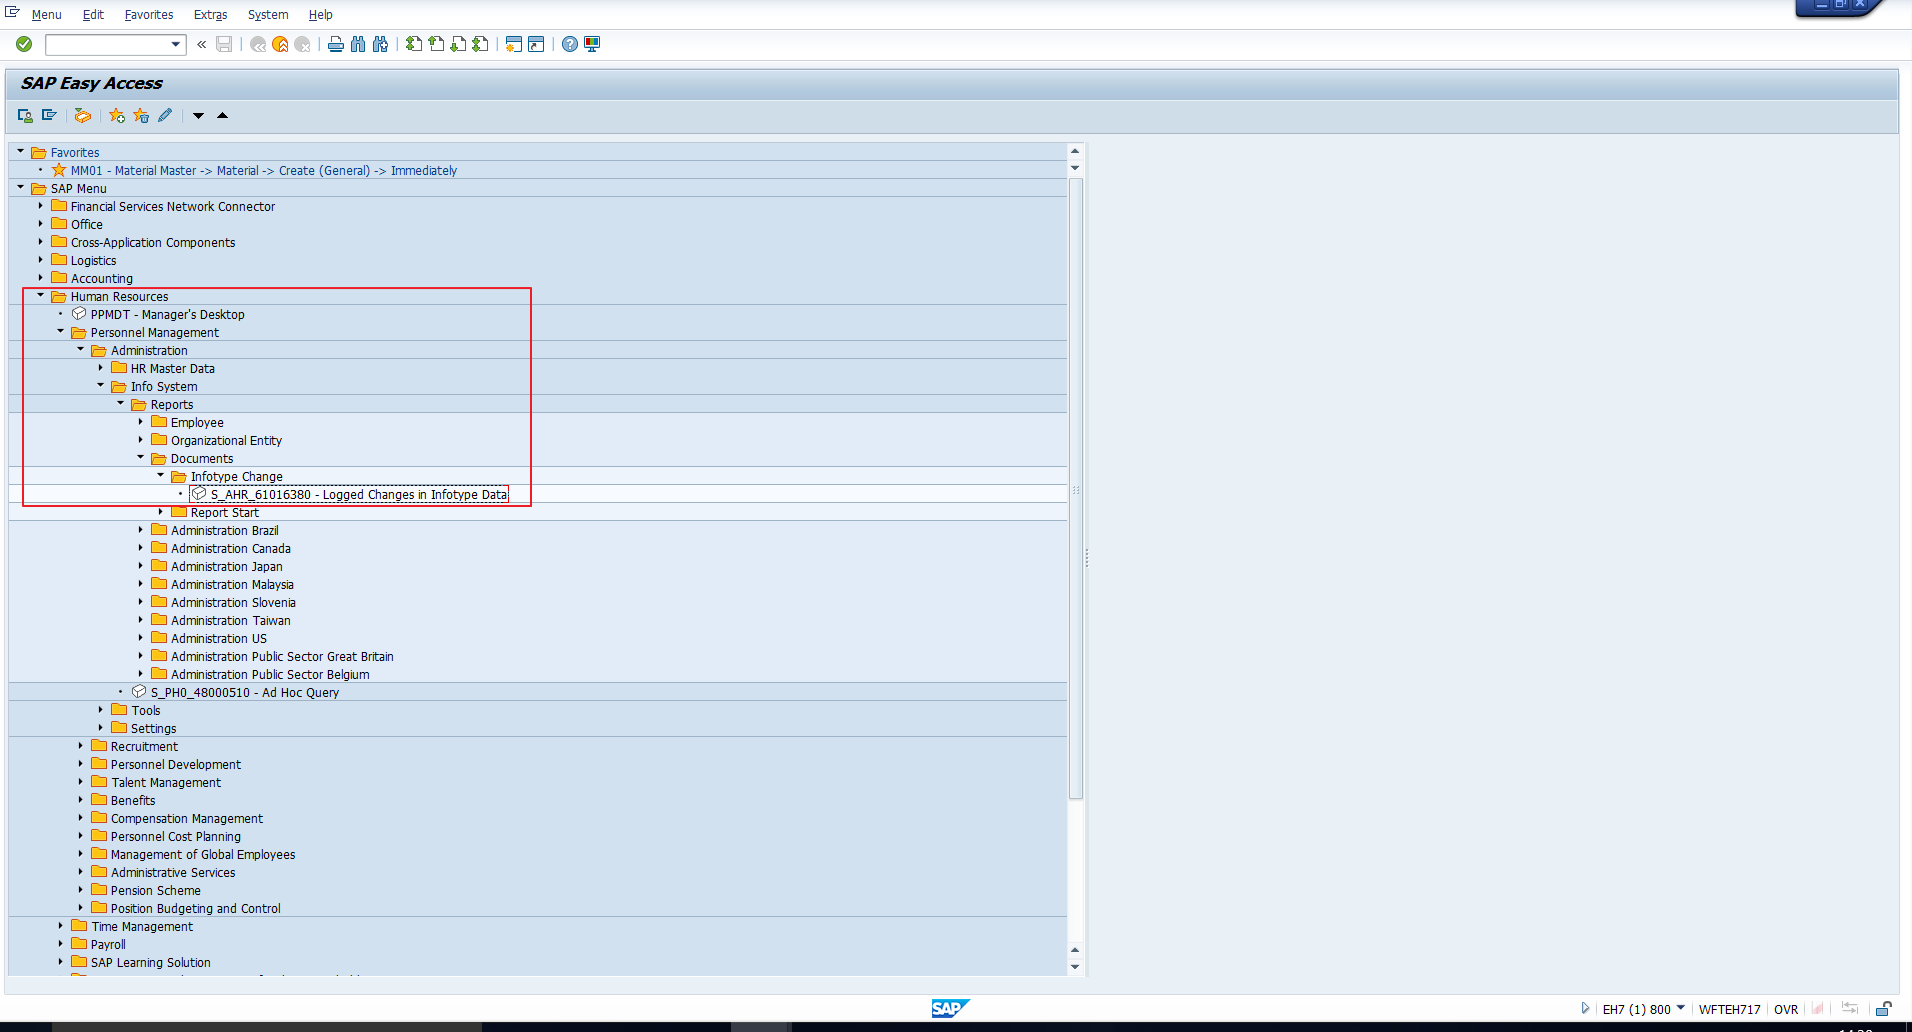
Once the above configuration steps have been completed for all the infotypes and fields to be logged, you can analyse the changes to these infotypes and fields using SAP infotype change log. To do this, execute the standard report “Logged changes in infotype data” using the transaction code or SAP Easy Access menu path shown in Figure 7.
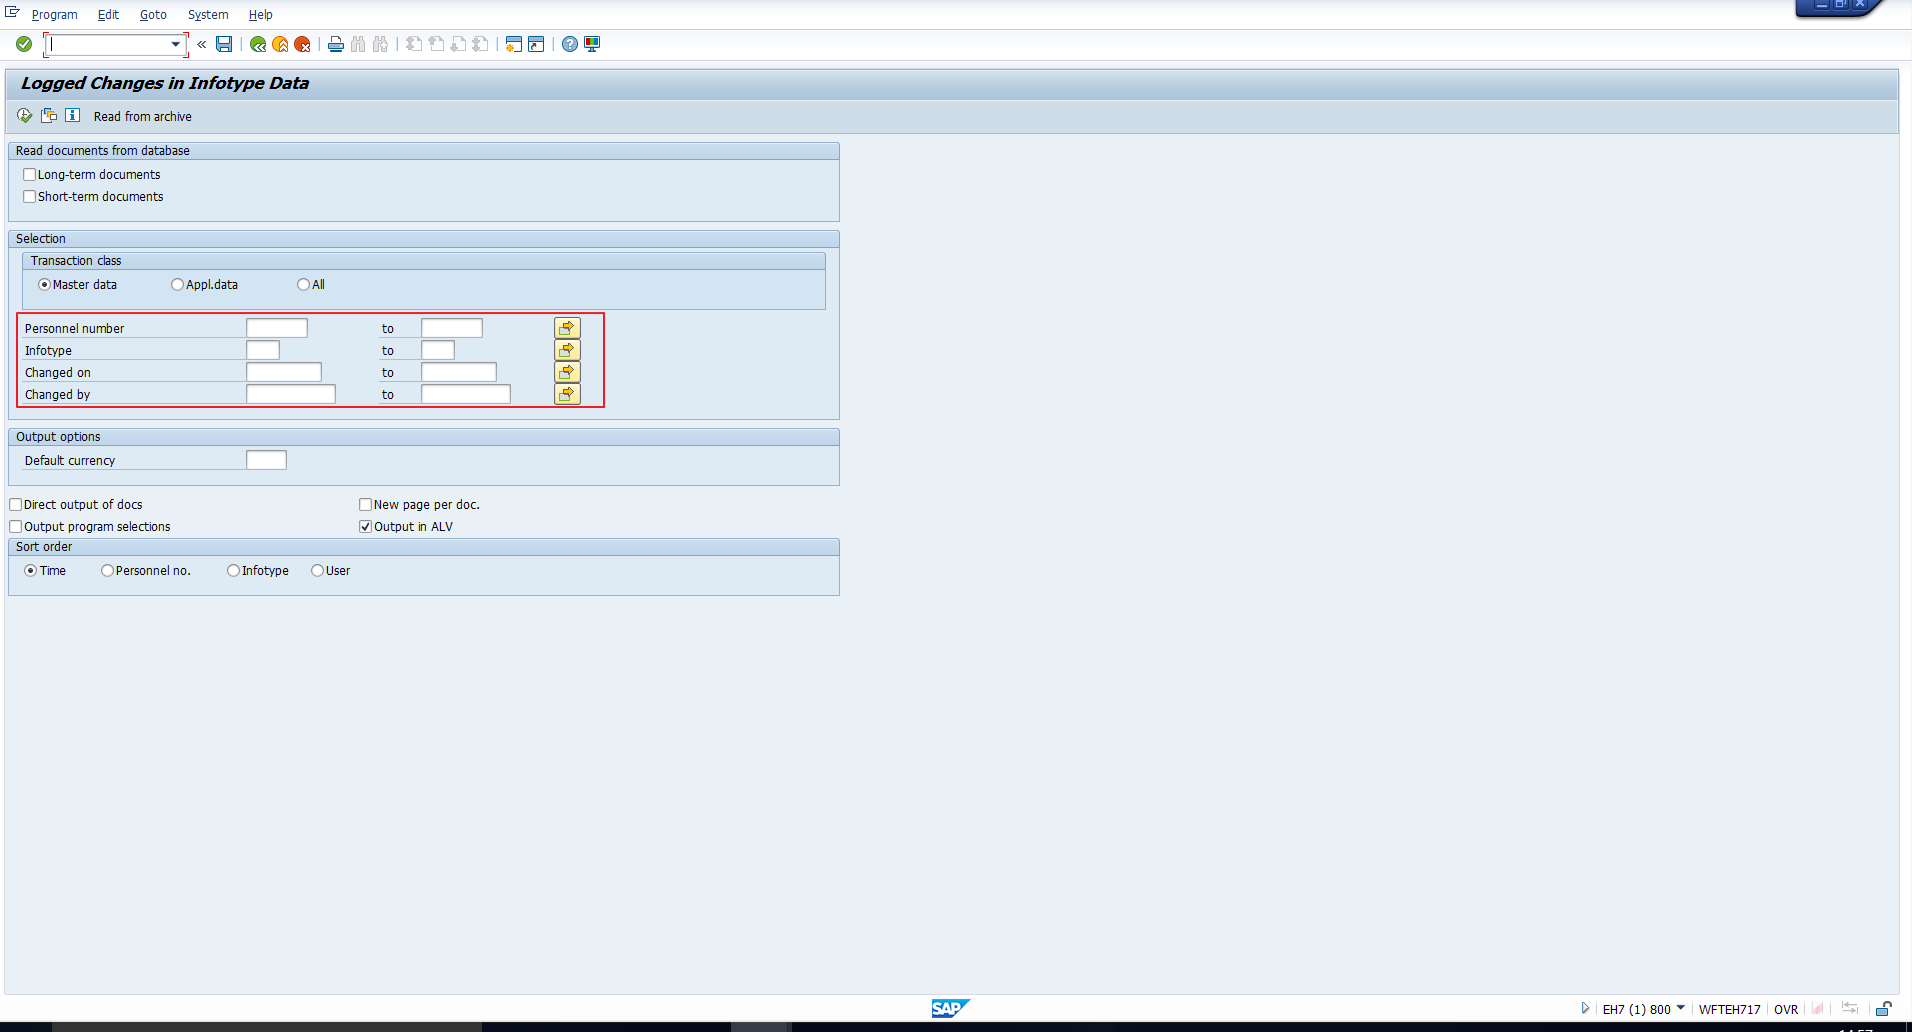
The report selection screen is shown in Figure 8.
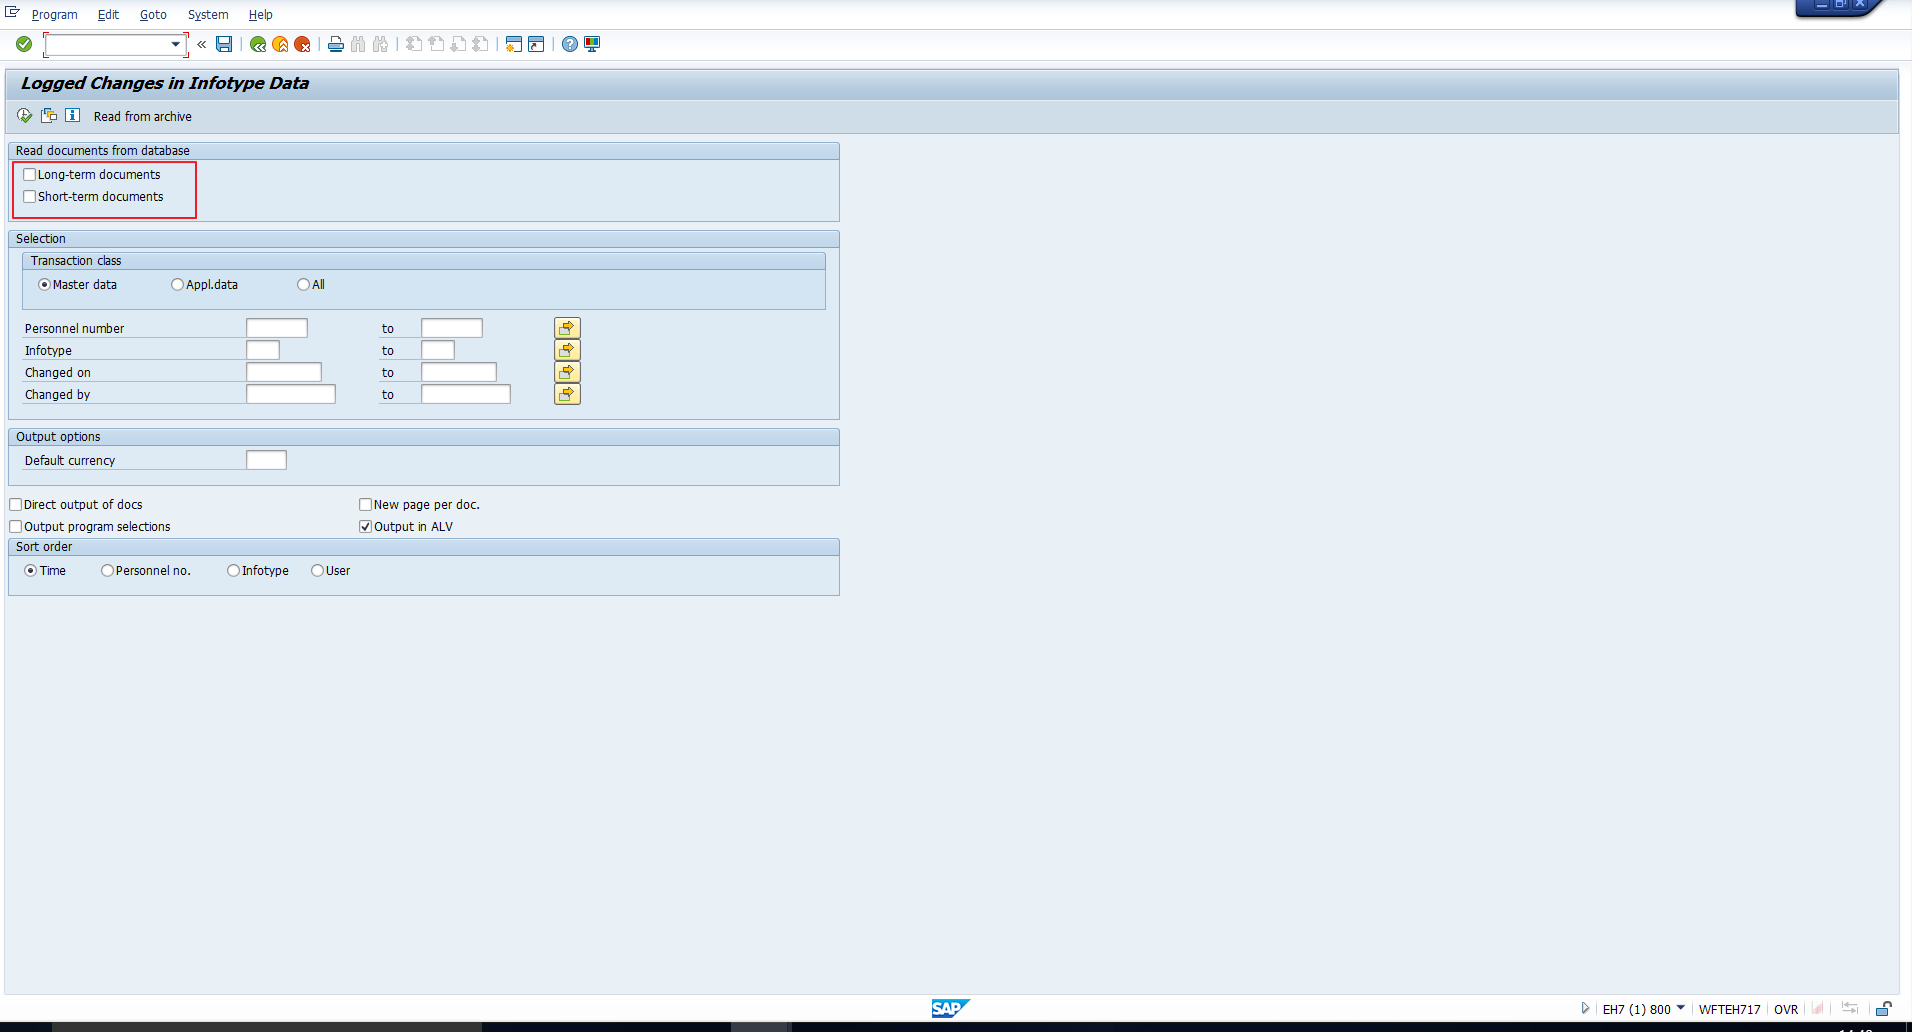
Let’s understand the selection fields. There are two checkboxes which determine the type of change documents:
- Long-term documents. If you select Long-term documents, then the columns Personnel number and Infotype are output first in the table. Please note that you should select this checkbox only if you have configured the required infotype for Long-term document creation in the configuration step ‘HR documents: Field group characteristics’, explained in the previous section.
- Short-term documents. If you select Short-term documents, then the Date and Time columns are displayed first in the table. Please note that you should select this checkbox only if you have configured the required infotype for Short-term document creation in the configuration step ‘HR documents: Field group characteristics’, explained in the previous section.
The fields related to selection of data as highlighted in Figure 9 are self-explanatory, but we will explain in brief.
- Personnel number – Specify the Employee number(s) whose data changes should be tracked.
- Infotype – Enter the infotype(s) for which you want to track the changes made.
- Changed on – Enter a date range to select changes made within that period only. Alternatively, you can specify a single date and use comparison operators to select data based on changed date.
- Changed by – Enter the user id(s) if you want to check the changes carried out by specific users only.
Let’s consider a couple of examples of using SAP infotype change log.
SAP Infotype Change Log: Example 1
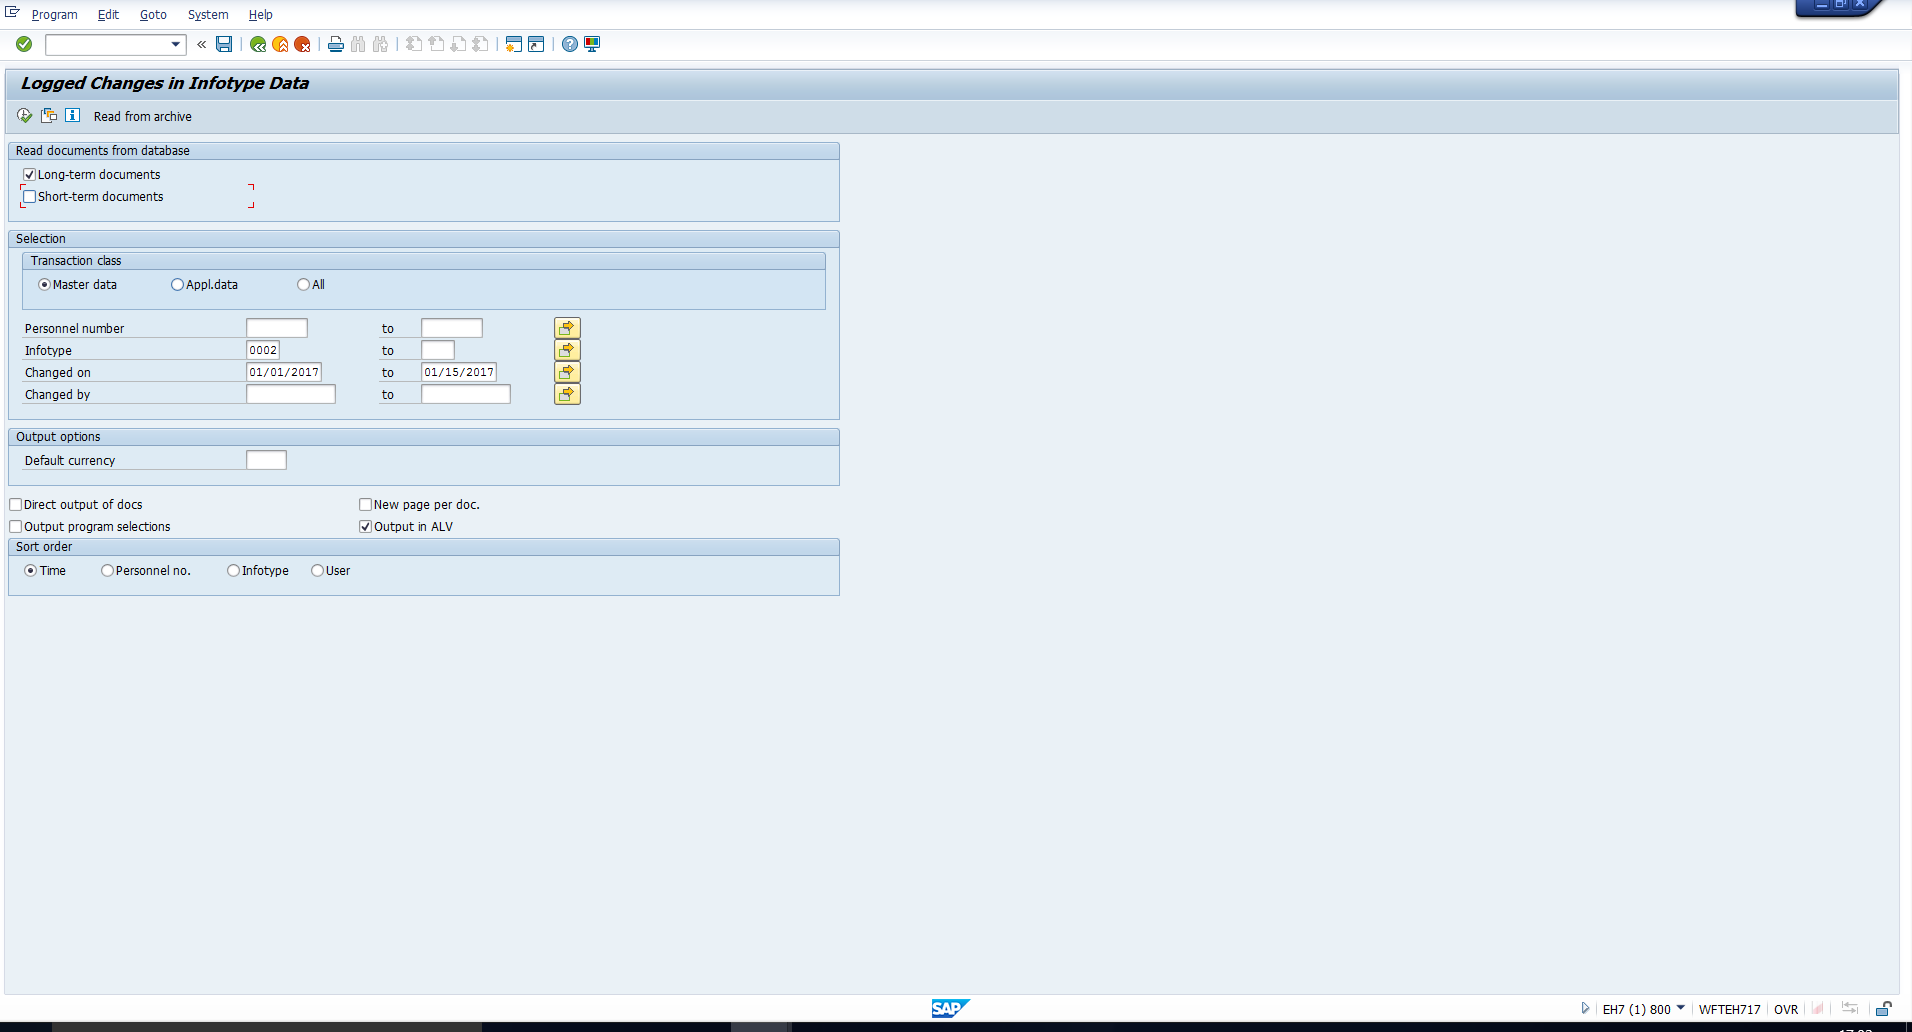
Assume we need to identify changes made to Infotype 0002 (Personal data) for all employees, for which the changes were made between 1st Jan 2017 and 15th Jan 2017.
We will enter the below selection values as shown in Figure 10.
On executing the report, we get the following output as shown in Figure 11.
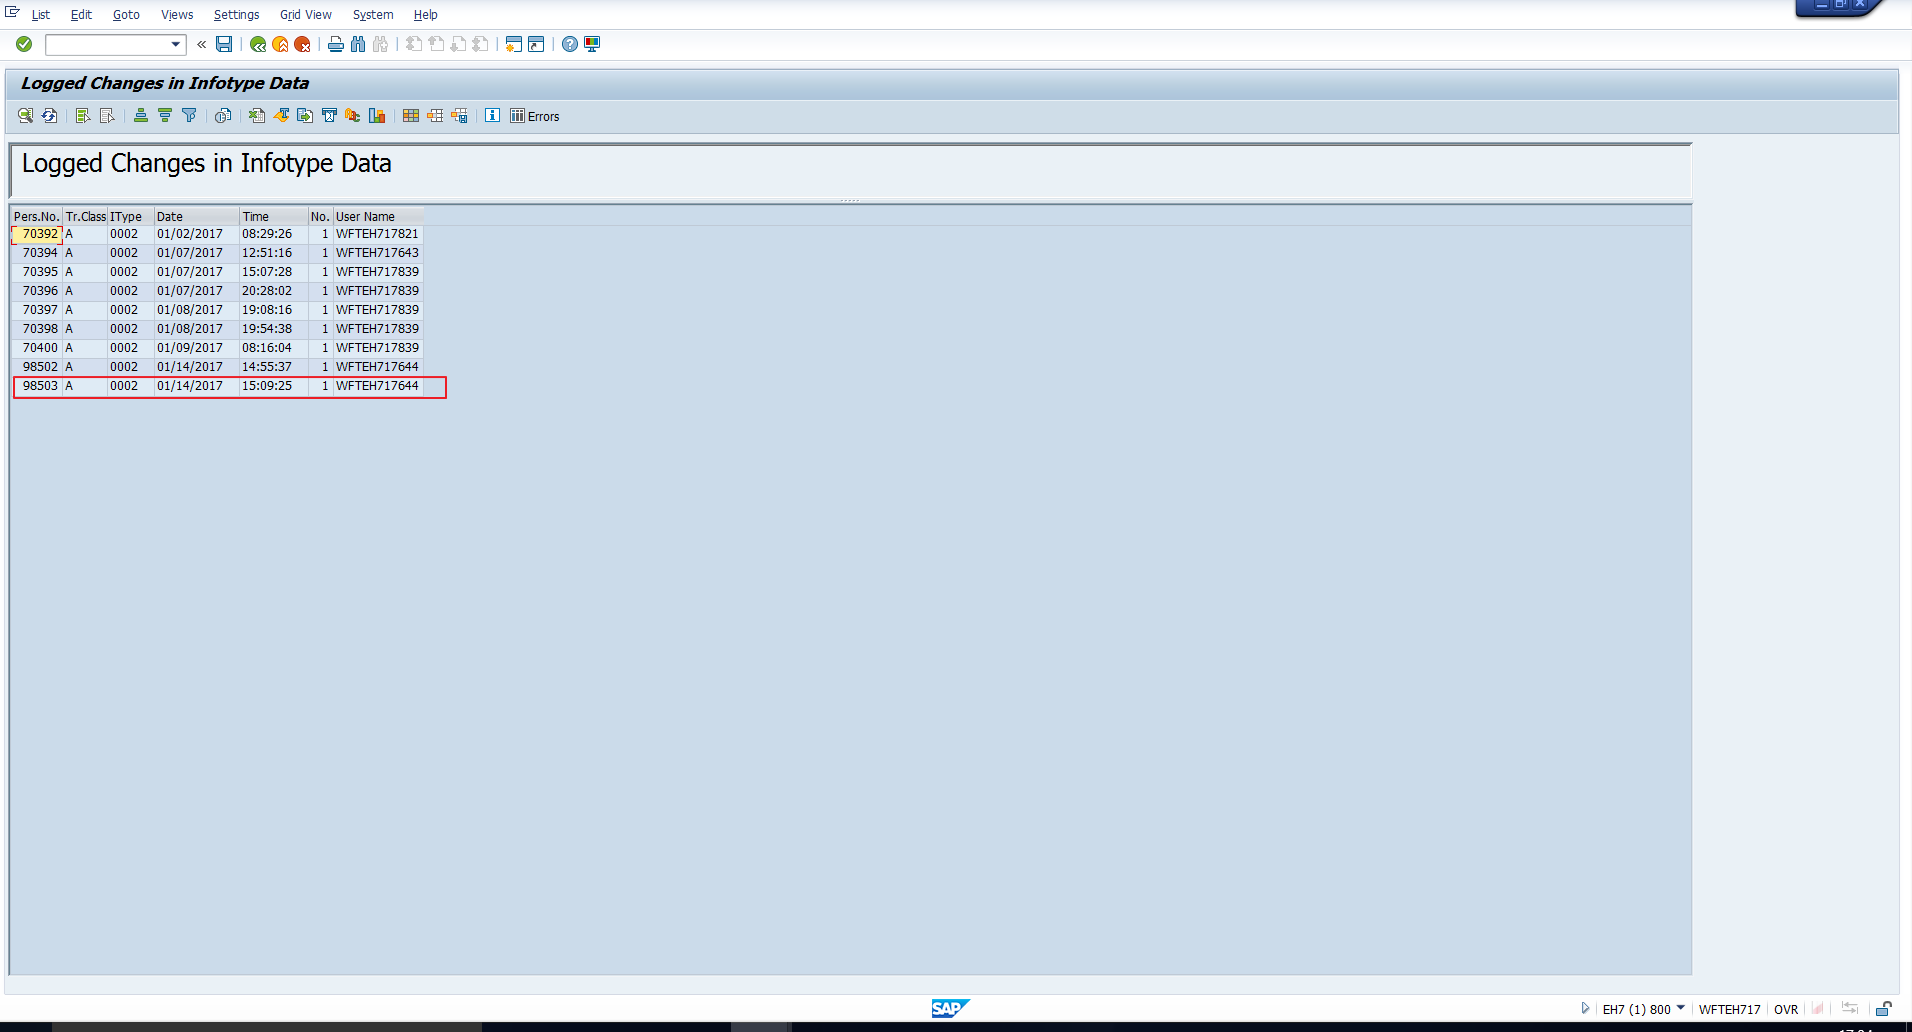
This screen presents an overview of the change documents including Personnel number, Infotype, Date, Time and User. To find out what changes were made, double click on the entry that you need to analyse in detail.
For example, assume we are interested in what changes were made for Personnel number 98503. Double click on the entry highlighted in Figure 11. This will take you to the screen depicted in Figure 12.
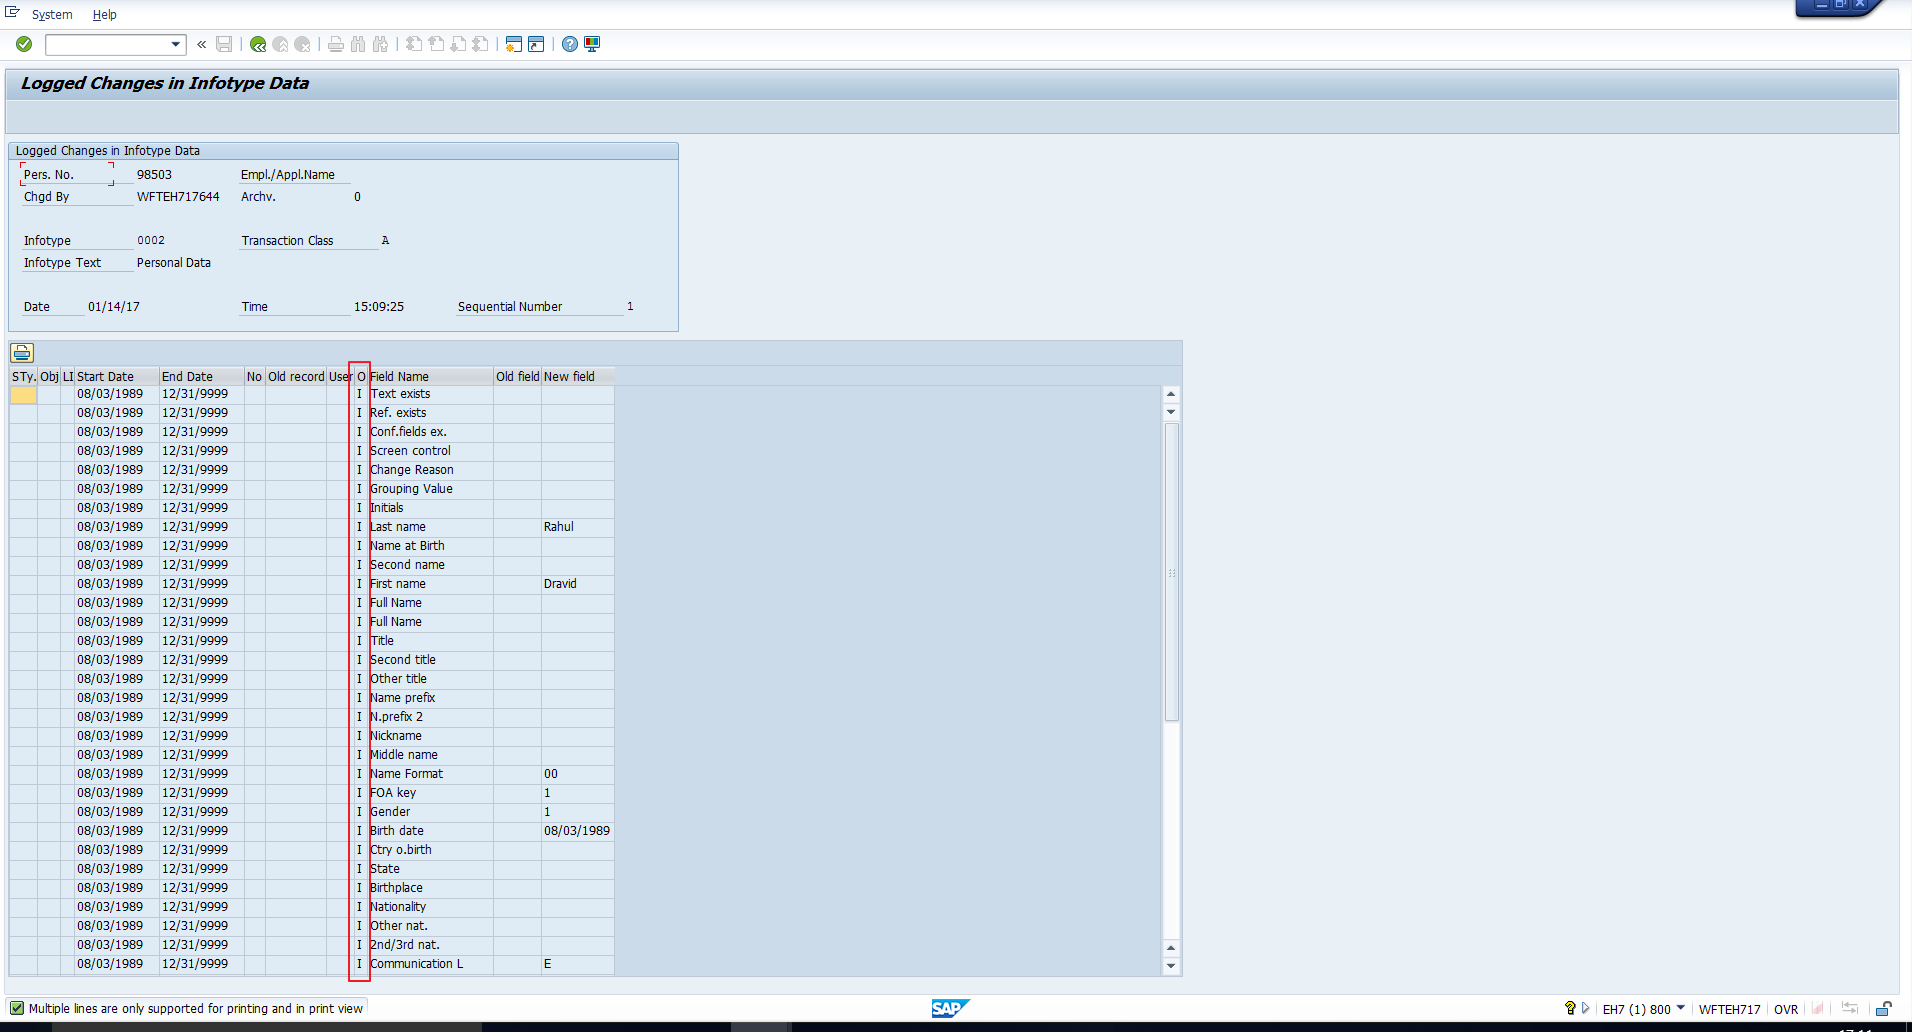
Look at the column titled ‘O’ which has been highlighted in Figure 12. This indicates the Operation indicator, which can have the below values:
- I – Insert (New infotype record created)
- D – Delete (Infotype record deleted)
- U – Update (Infotype field contents changed)
You can see the contents of every field in the column “New field”.
SAP Infotype Change Log: Example 2
Assume we want an overview of changes made to infotype 0002 (Personal data) after 1st June 2017. Our selection screen will be as shown in Figure 13.
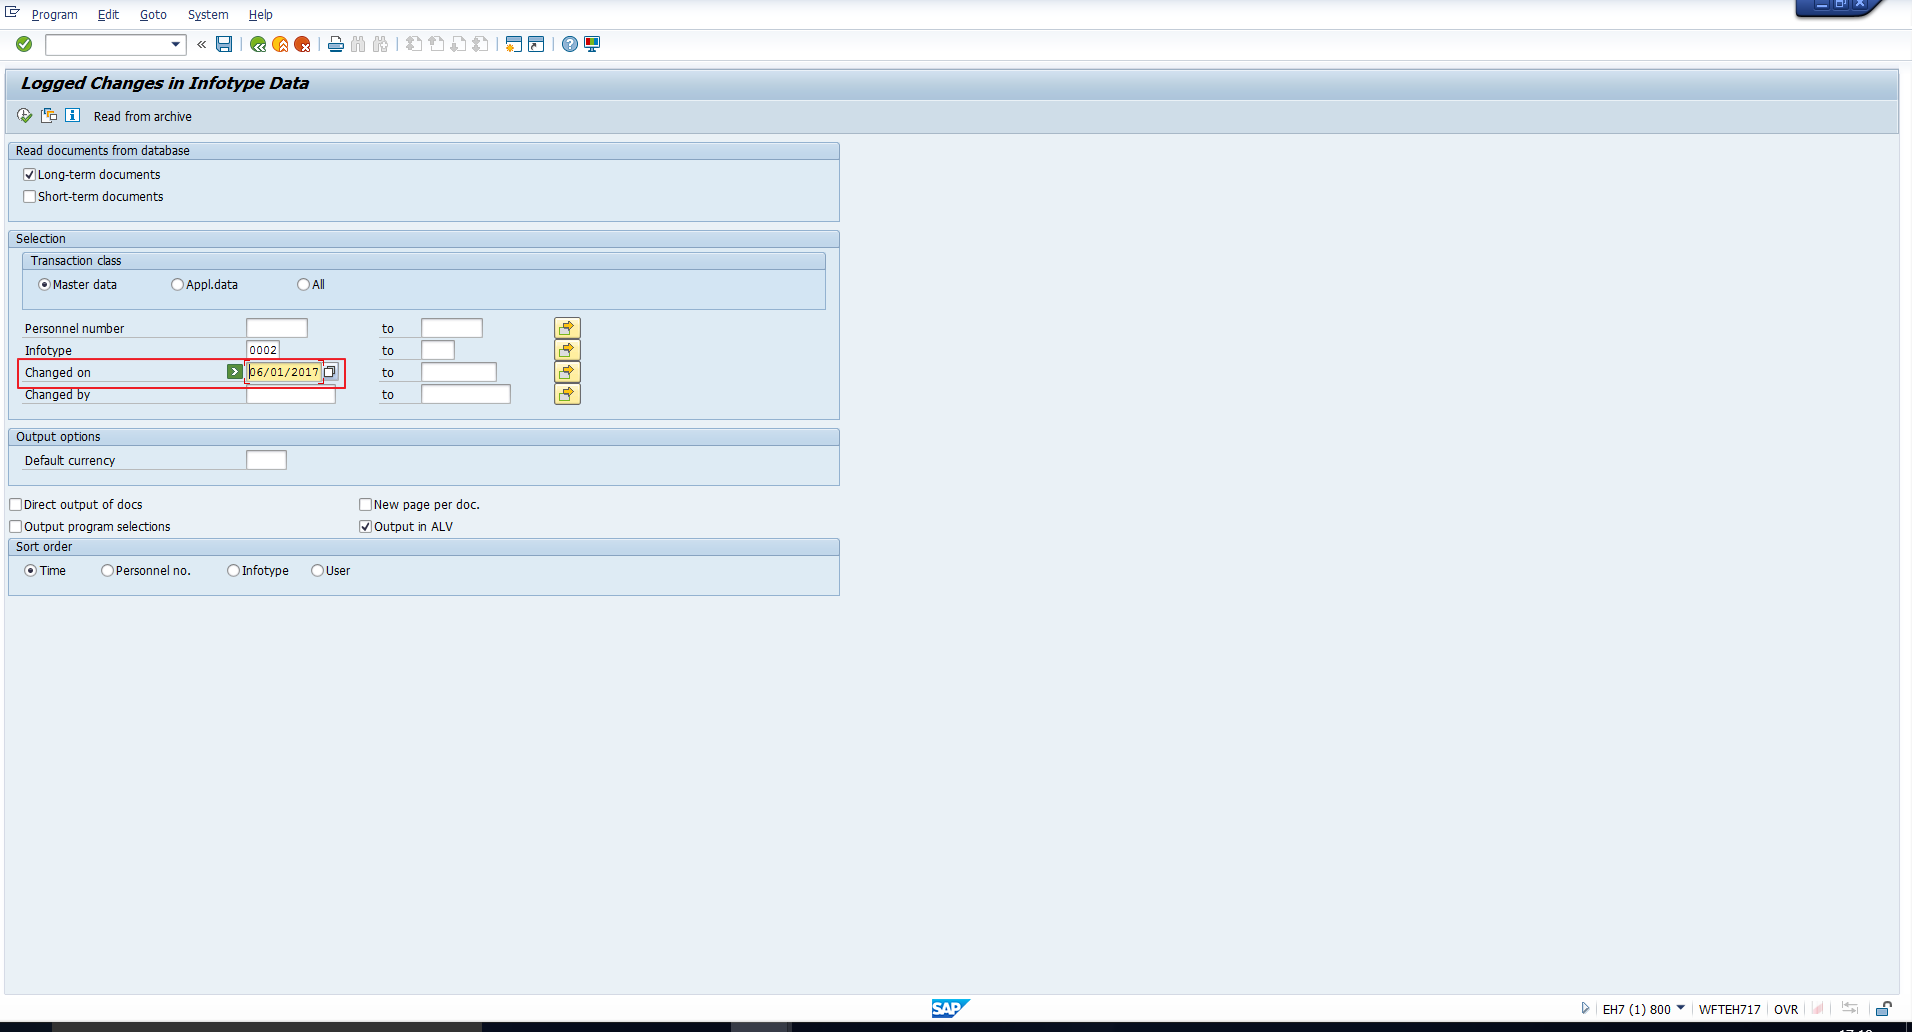
Note that we have used the ‘>’ comparison operator for the ‘Changed on’ date condition.
On executing the report, we get the following output as shown in Figure 14.
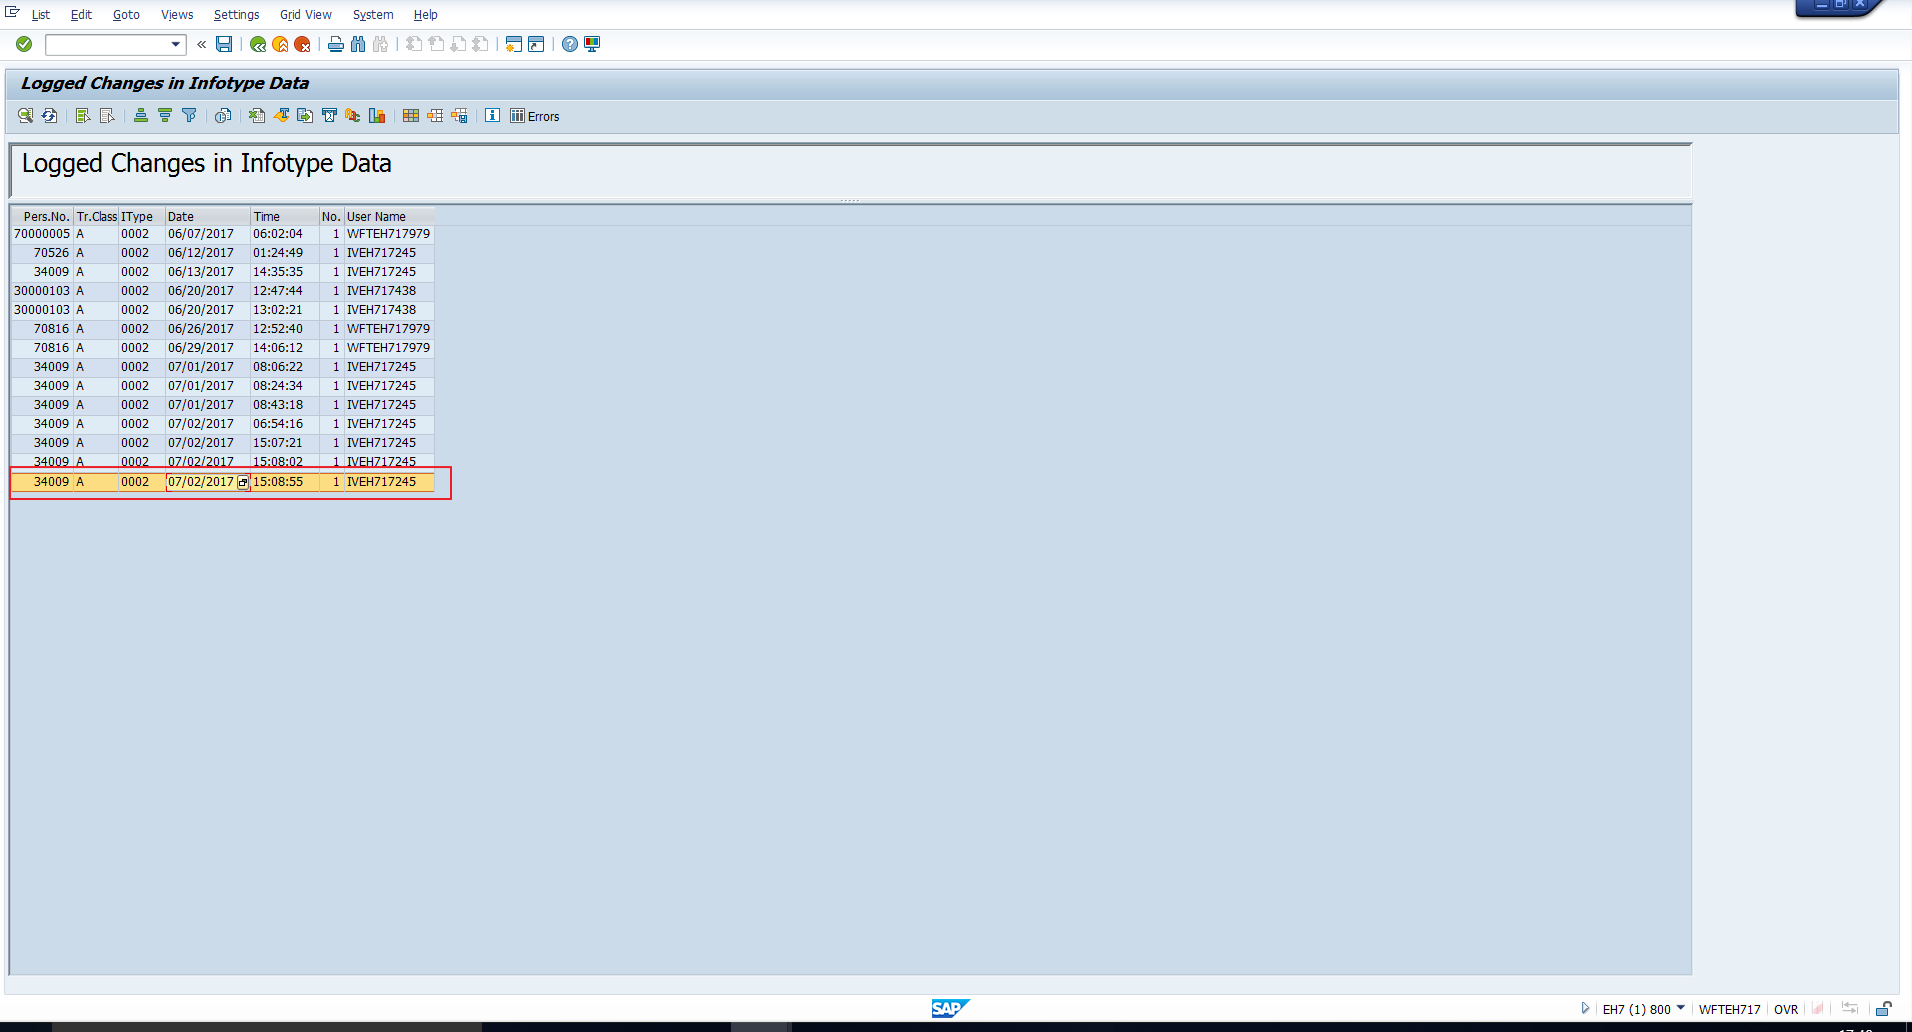
This screen presents an overview of the change documents including Personnel number, Infotype, Date, Time and User. To find out what changes were made, double click on the entry that you need to analyse in detail.
For example, assume we are interested in the latest changes made for Personnel number 34009. Double click on the entry highlighted in Figure 14. This will take you to the screen depicted in Figure 15.
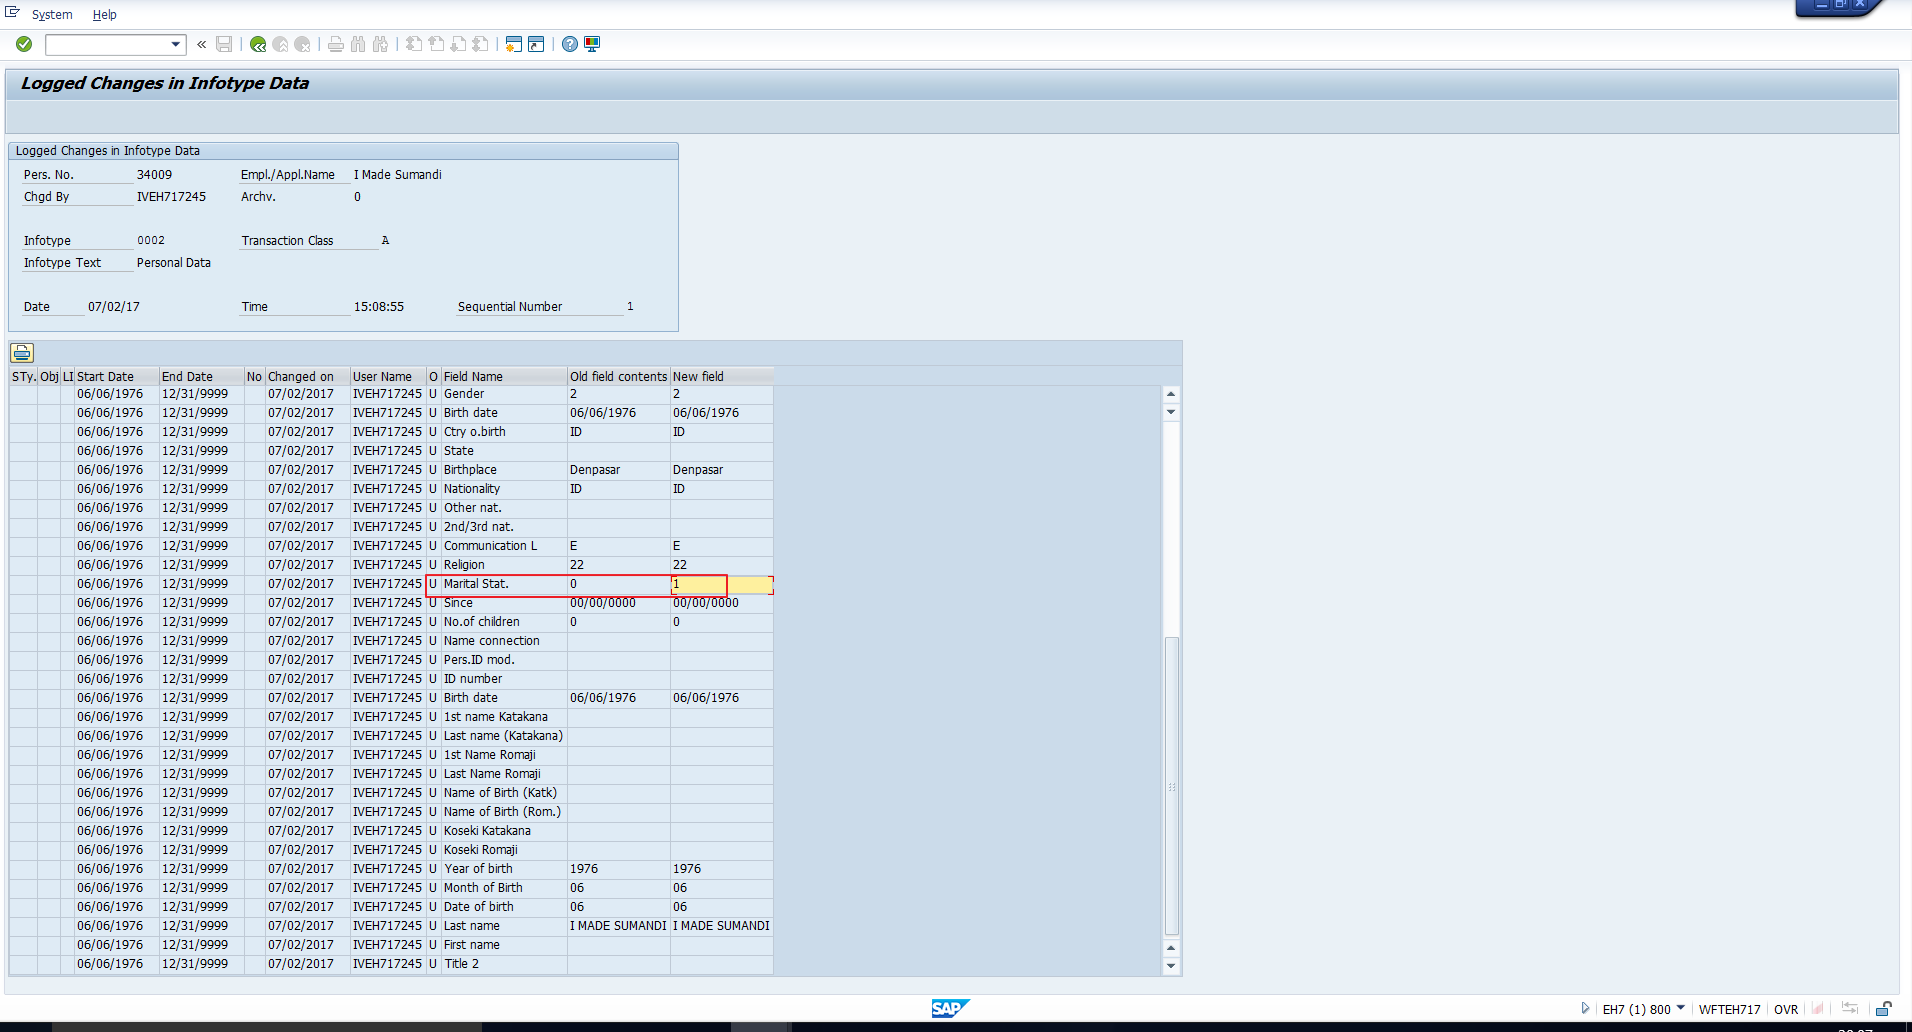
Here the Operation indicator has value ‘U’ which means infotype data has been updated. To understand what data was changed, for each field name, compare the columns “Old field contents” and “New field”. On doing so, we can see that the Marital status fields was changed from ‘0’ (Single) to ‘1’ (Married).
—
Did you like this tutorial? Have any questions or comments? We would love to hear your feedback in the comments section below. It’d be a big help for us, and hopefully it’s something we can address for you in improvement of our free SAP HR tutorials.
Navigation Links
Go to next lesson: SAP Organizational Management Overview
Go to previous lesson: SAP Dynamic Actions
Go to overview of the course: SAP HR Training
This information was great, I can analyze any of my problemas about how to show the logged of infotypes, unfortunely we have spanish version, but it’s ok. Thanks a lot for the author.
Is there any way to get history of changes but on PD record –> organizational unit –> infotype 1000?
I need to get the old description of infotype when the record has been overwritten.