
 Welcome to the tutorial on SAP Personnel Number Assignment. This tutorial is part of our free SAP HCM course. A personnel number is an eight-digit field which is used to uniquely identify an employee in SAP. SAP personnel number is a key field in every single HR master table and hence, it seems only fair to dedicate a tutorial to this field and how it is assigned to an employee.
At the time of implementing SAP HCM in any organization, it is most likely that employee numbers have already been assigned to the employees. Now, it is a business decision whether to continue with the old employee numbers assigned in the legacy system or whether to start afresh with new number ranges in SAP. Most companies opt for the latter as it is more standardized and less cumbersome. SAP HCM allows for both options with the below solutions:
- External number assignment. Here you can assign SAP personnel number yourself, as long it lies within the applicable number range. The applicable number range is selected based on the configuration of the NUMKR feature.
- Internal number assignment. Here SAP personnel number is automatically assigned by the system as the next available number within the applicable number range. The applicable number range is selected based on the configuration of the NUMKR feature.
The configuration of personnel number assignment consists of the below steps.
1. Maintain SAP Number Range Intervals
In this step, the various number range intervals are defined. This includes specifying the interval limits (From number, To number) and the type of interval (Internal/External).
2. Determine Defaults for Number Ranges Using the NUMKR Feature
When an employee is hired, this feature is used to determine which number range should be defaulted for the employee based on various fields of the enterprise or personnel structure. Which fields should be used to control the applicable number range is based on the client’s policy and requirement.
For example, in the simplest case, the number range can be assigned based on a company code. That means all employees in a given company can be assigned a personnel number within a specific number range.
In other cases, the number range could differ based on employee category, that is, Employee Group or Employee Subgroup. For example, all regular employees should be assigned a personnel number within a certain number range, while pensioners should be assigned a number in a different number range. This is useful as it enables quick identification of an employee’s category based on his/her personnel number.
Configuration Steps for SAP Personnel Number Assignment
Let’s consider an example. For company code A001 (Country grouping 04 – Spain), you want to define two number ranges:
78000– 78999 (Internal number range) which is applicable to all regular employees.
79000 – 79999 (Internal number range) which is applicable to all Pensioners.
Let us go through the step-by-step configuration to be done.
Define number range intervals
There are two ways to reach this configuration node.
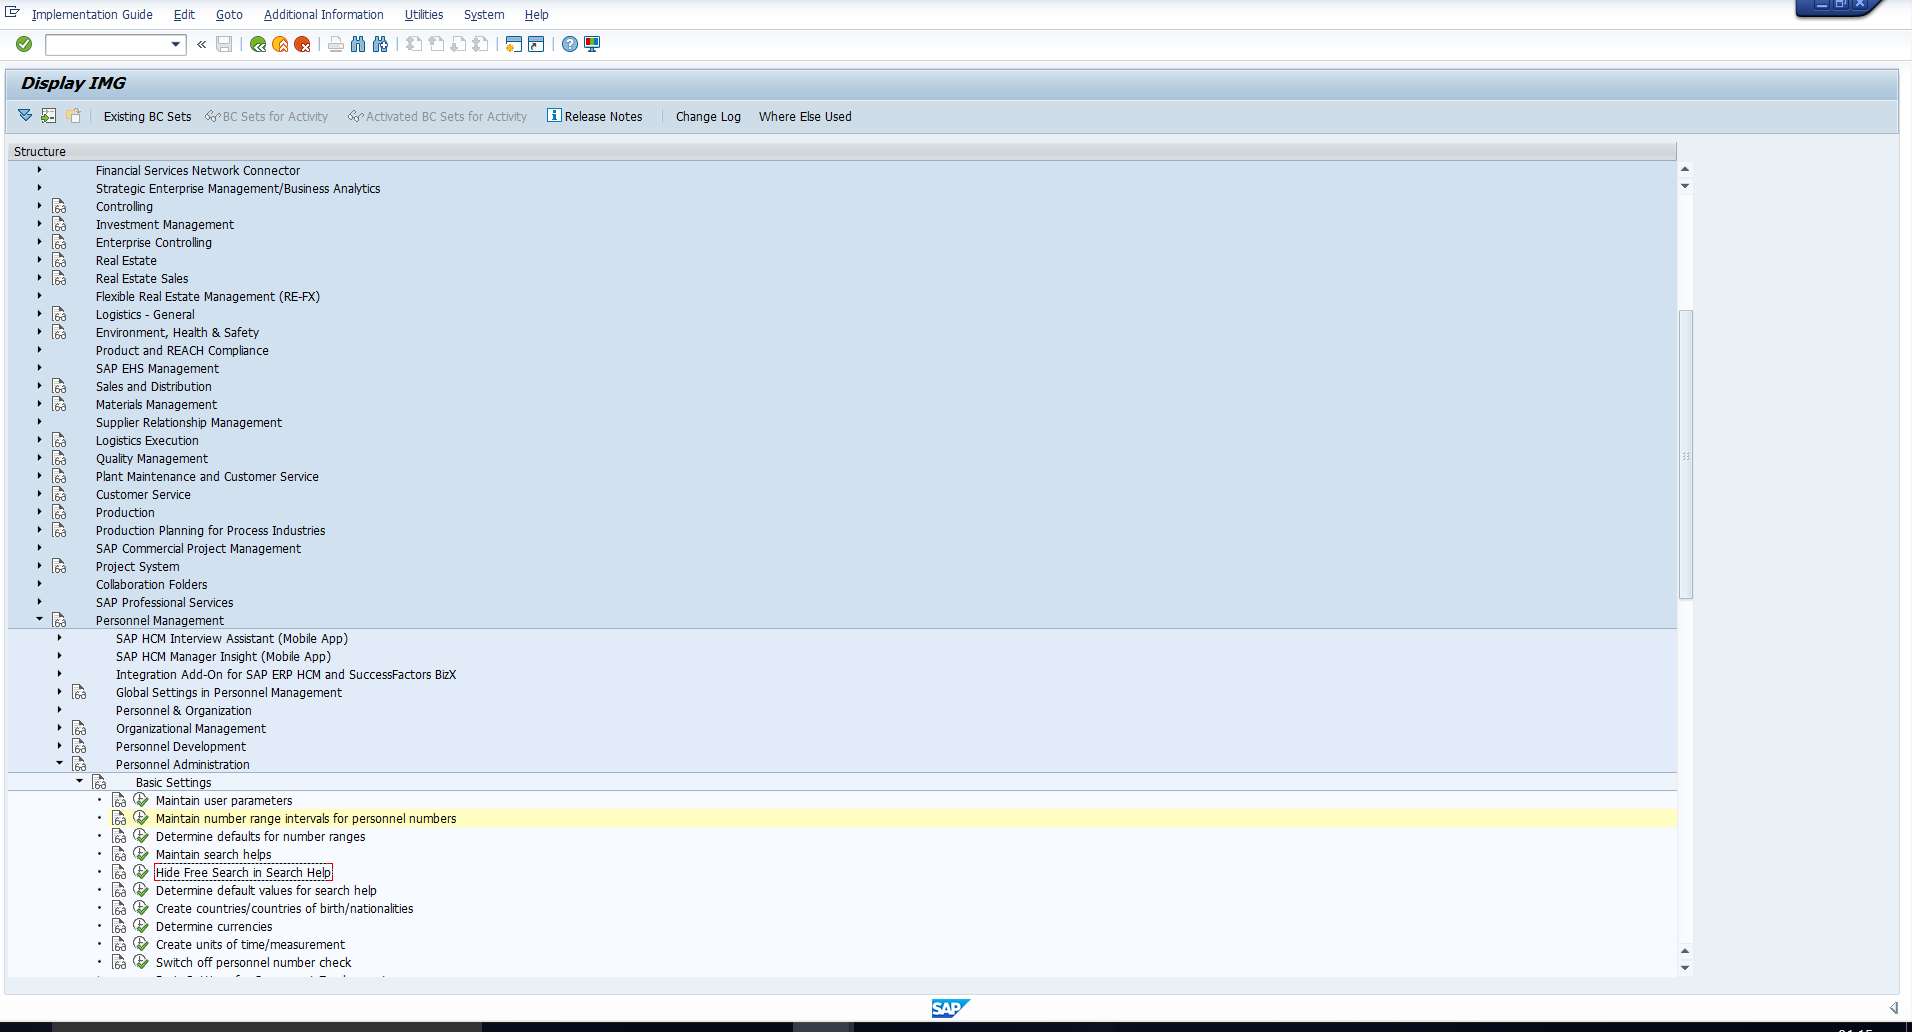
1. Enter transaction code SPRO and then follow the below mentioned customizing path
Personnel Management – Personnel Administration – Basic settings – Maintain number range intervals for personnel numbers
This is shown in picture below.
2. Enter transaction code PA04. This directly takes you to the same configuration step, which is shown in the picture below.

In this step, you can do three things:
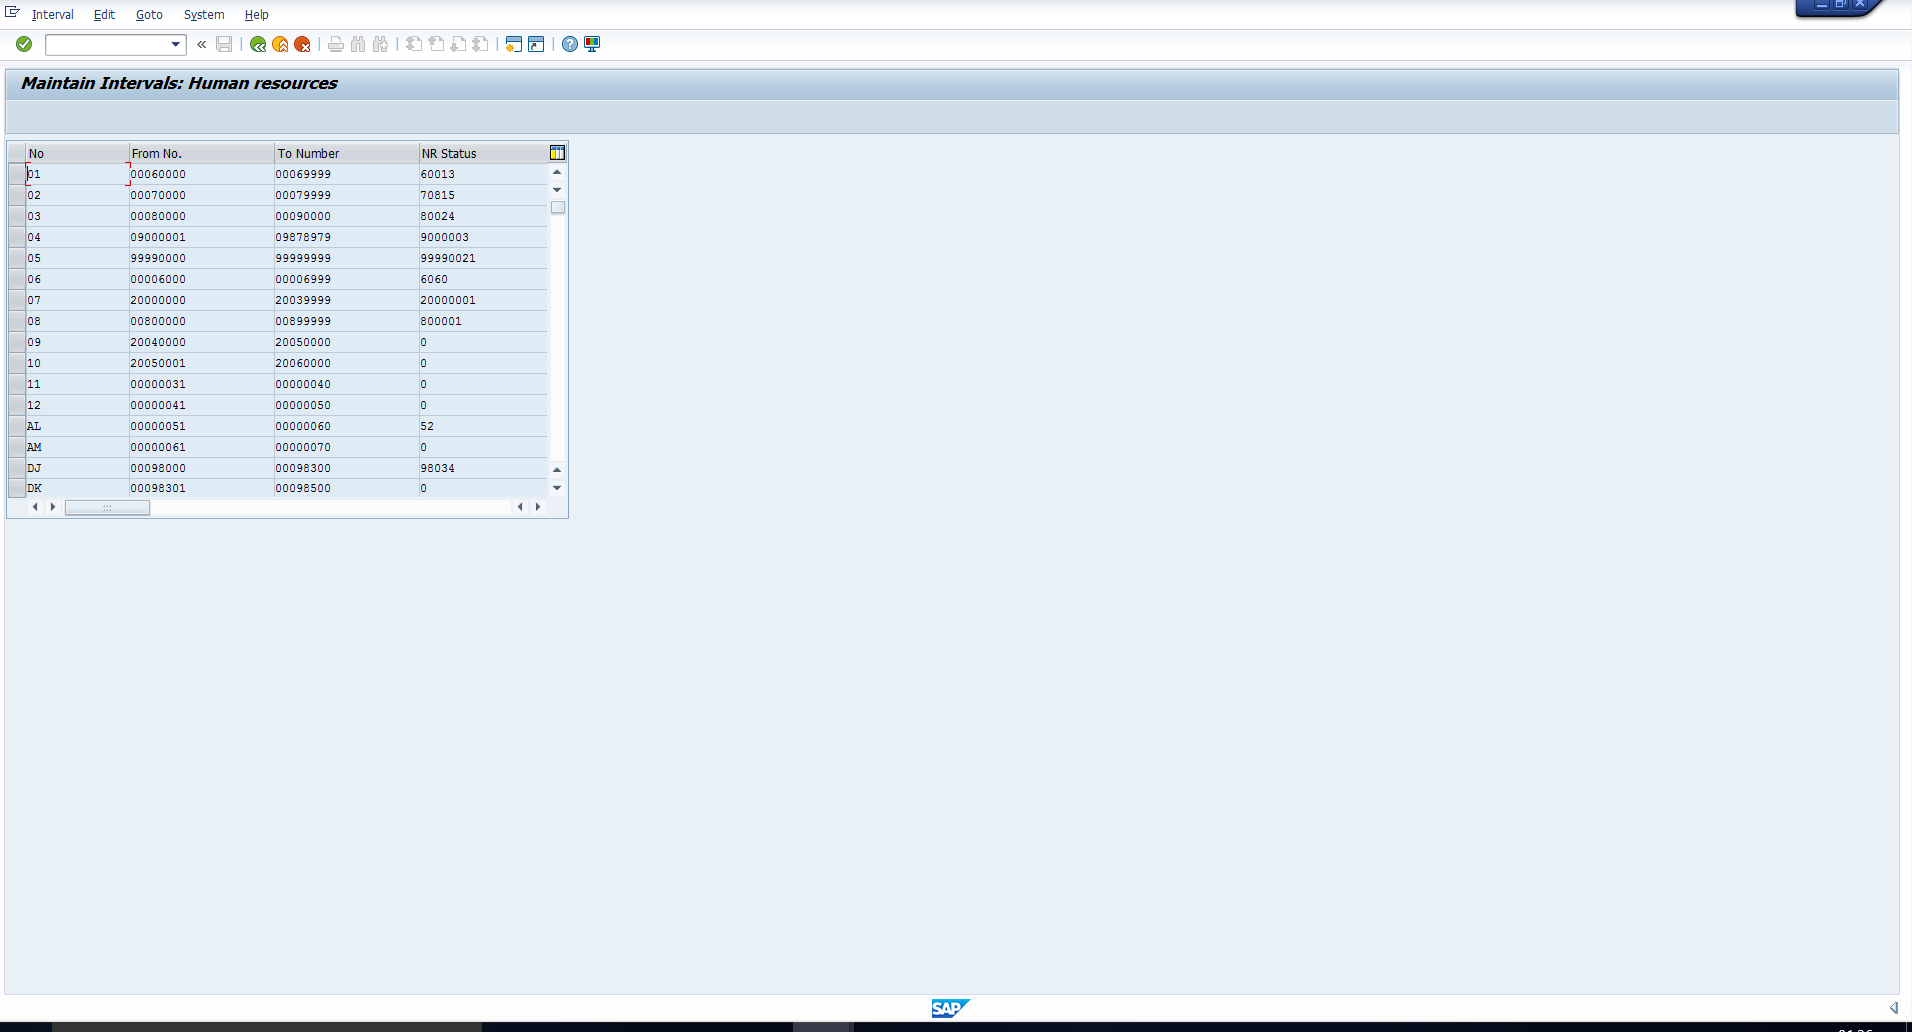
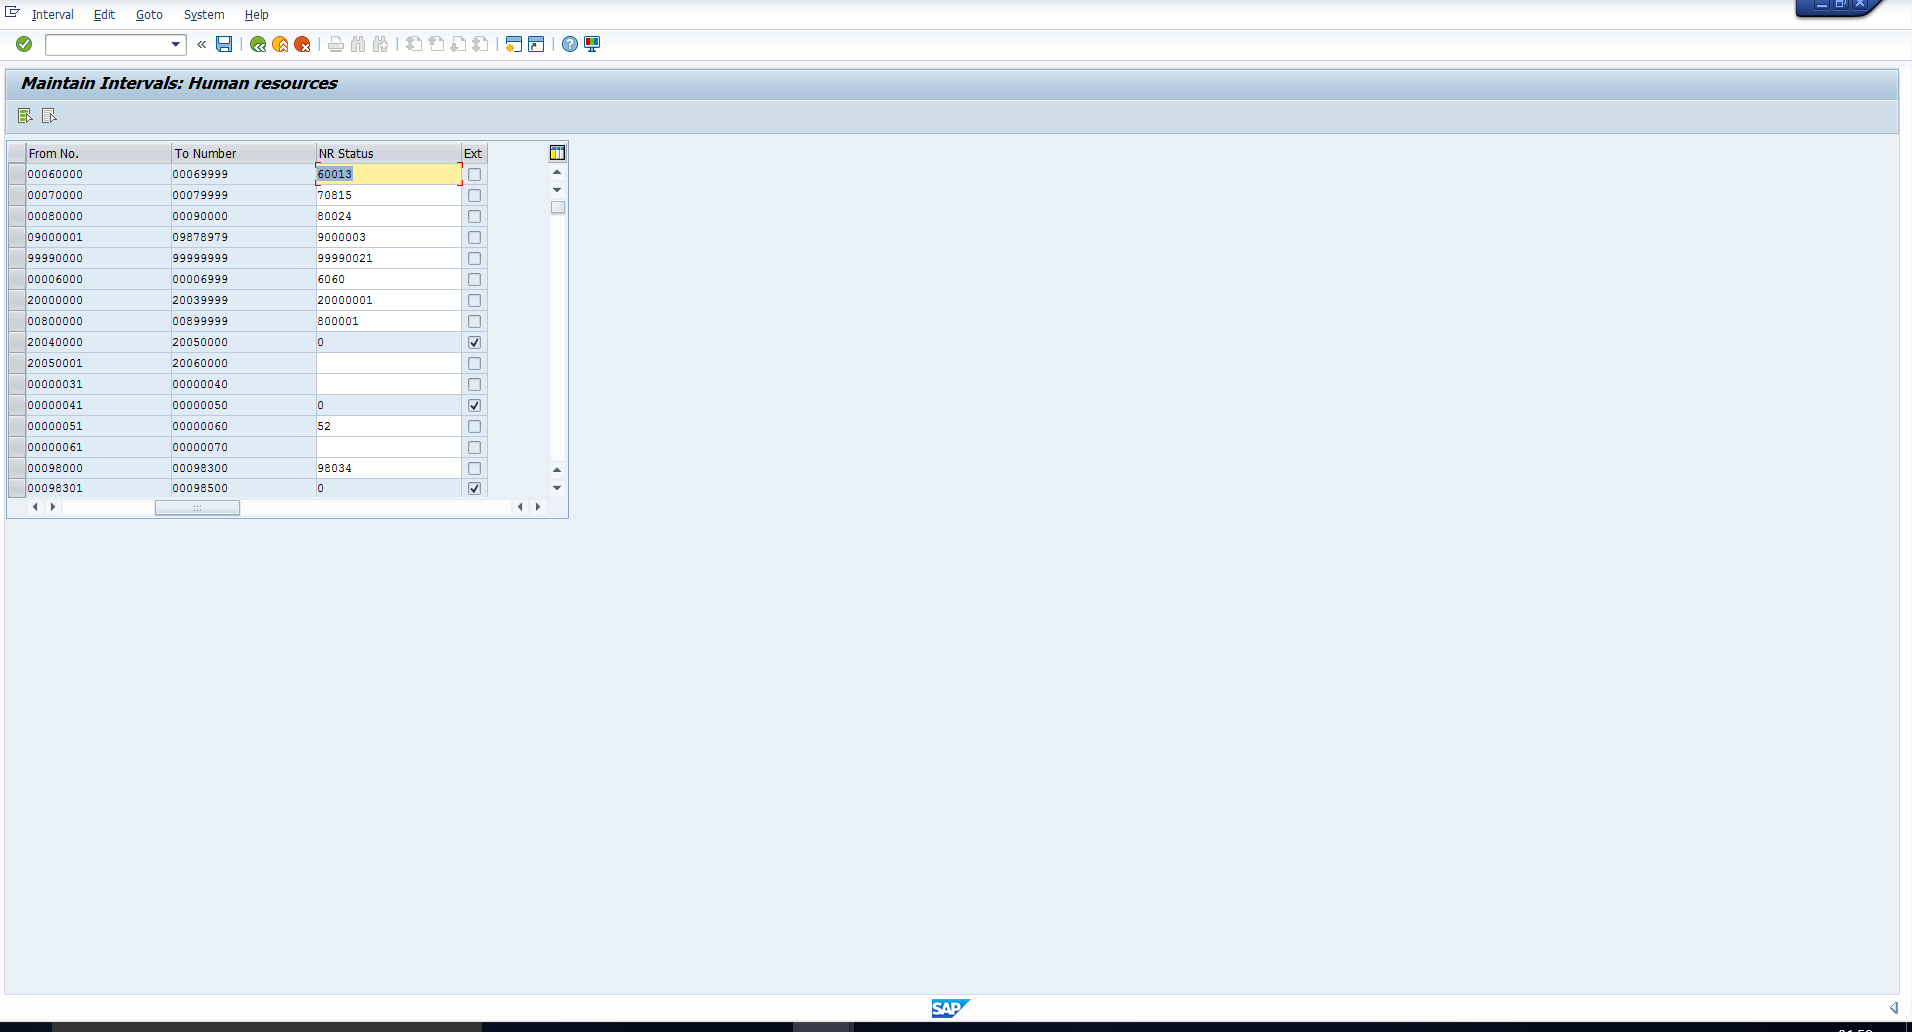
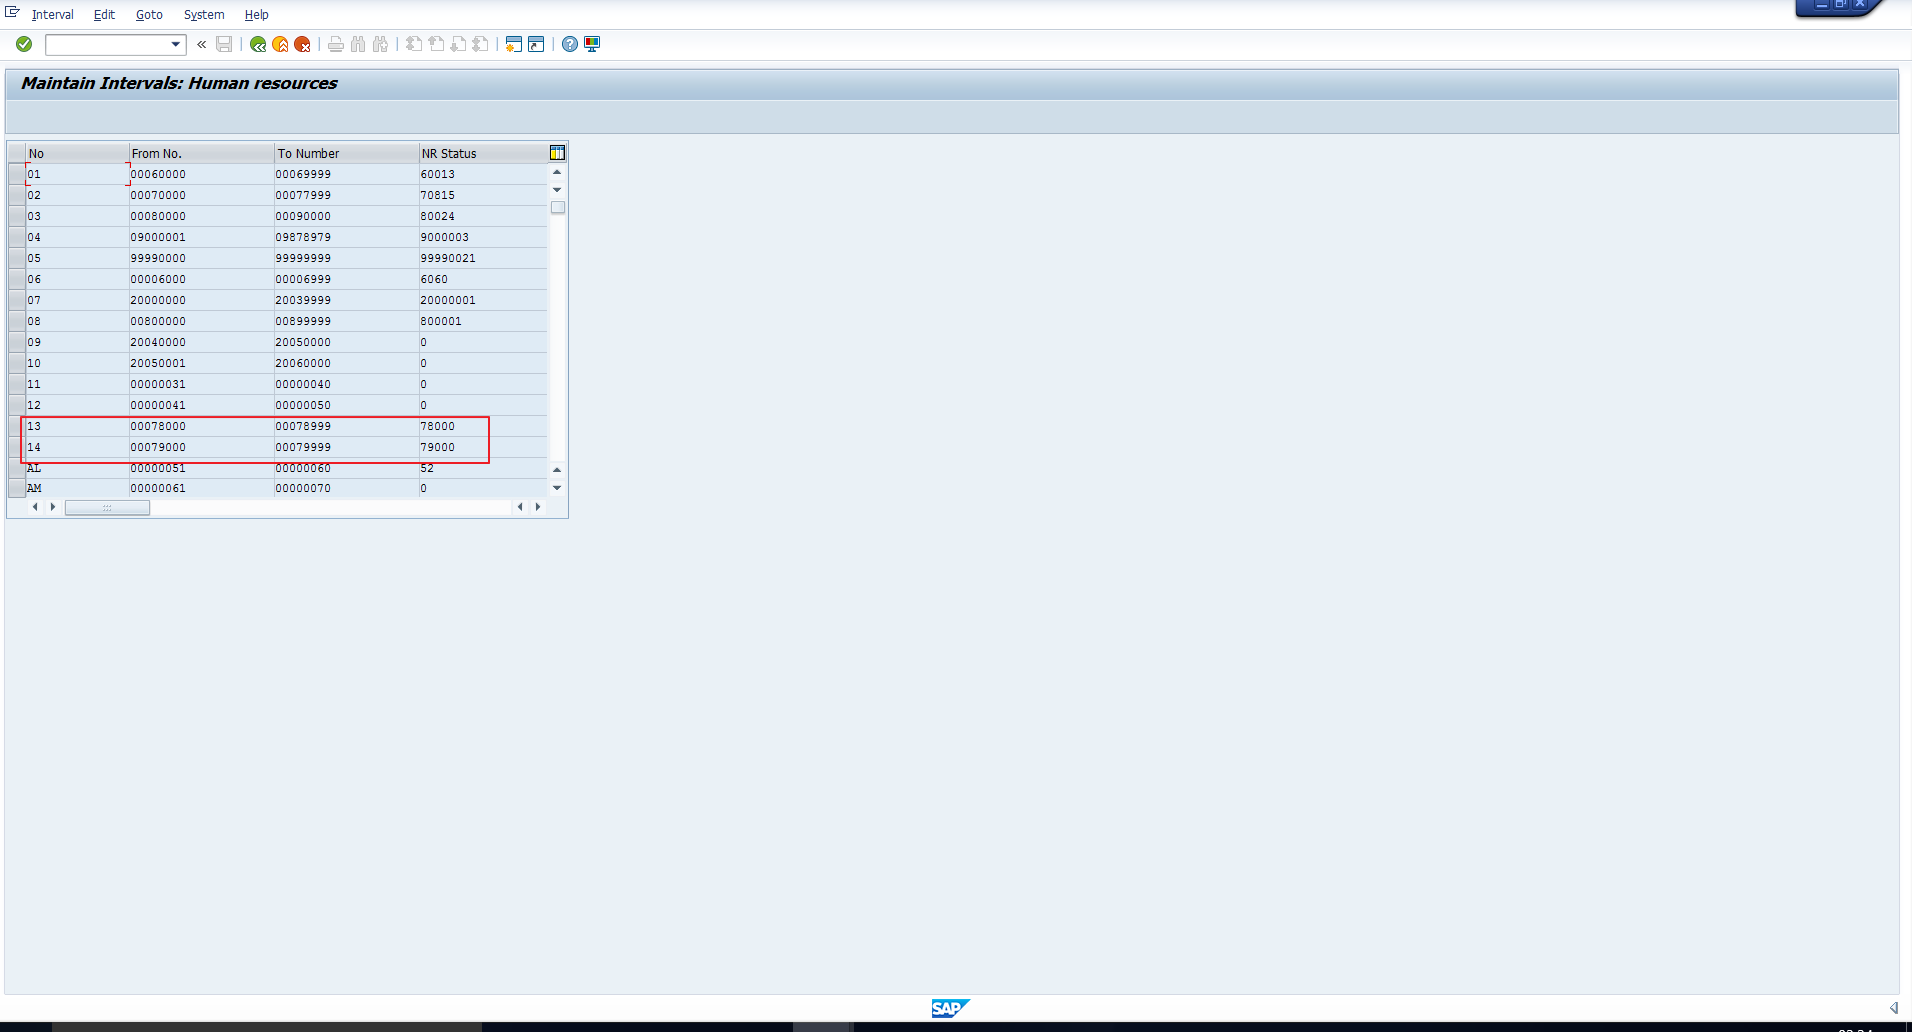
1. Display intervals. The first pushbutton takes you to the screen as shown in screenshots below.
Here is a brief explanation of the columns on pictures above:
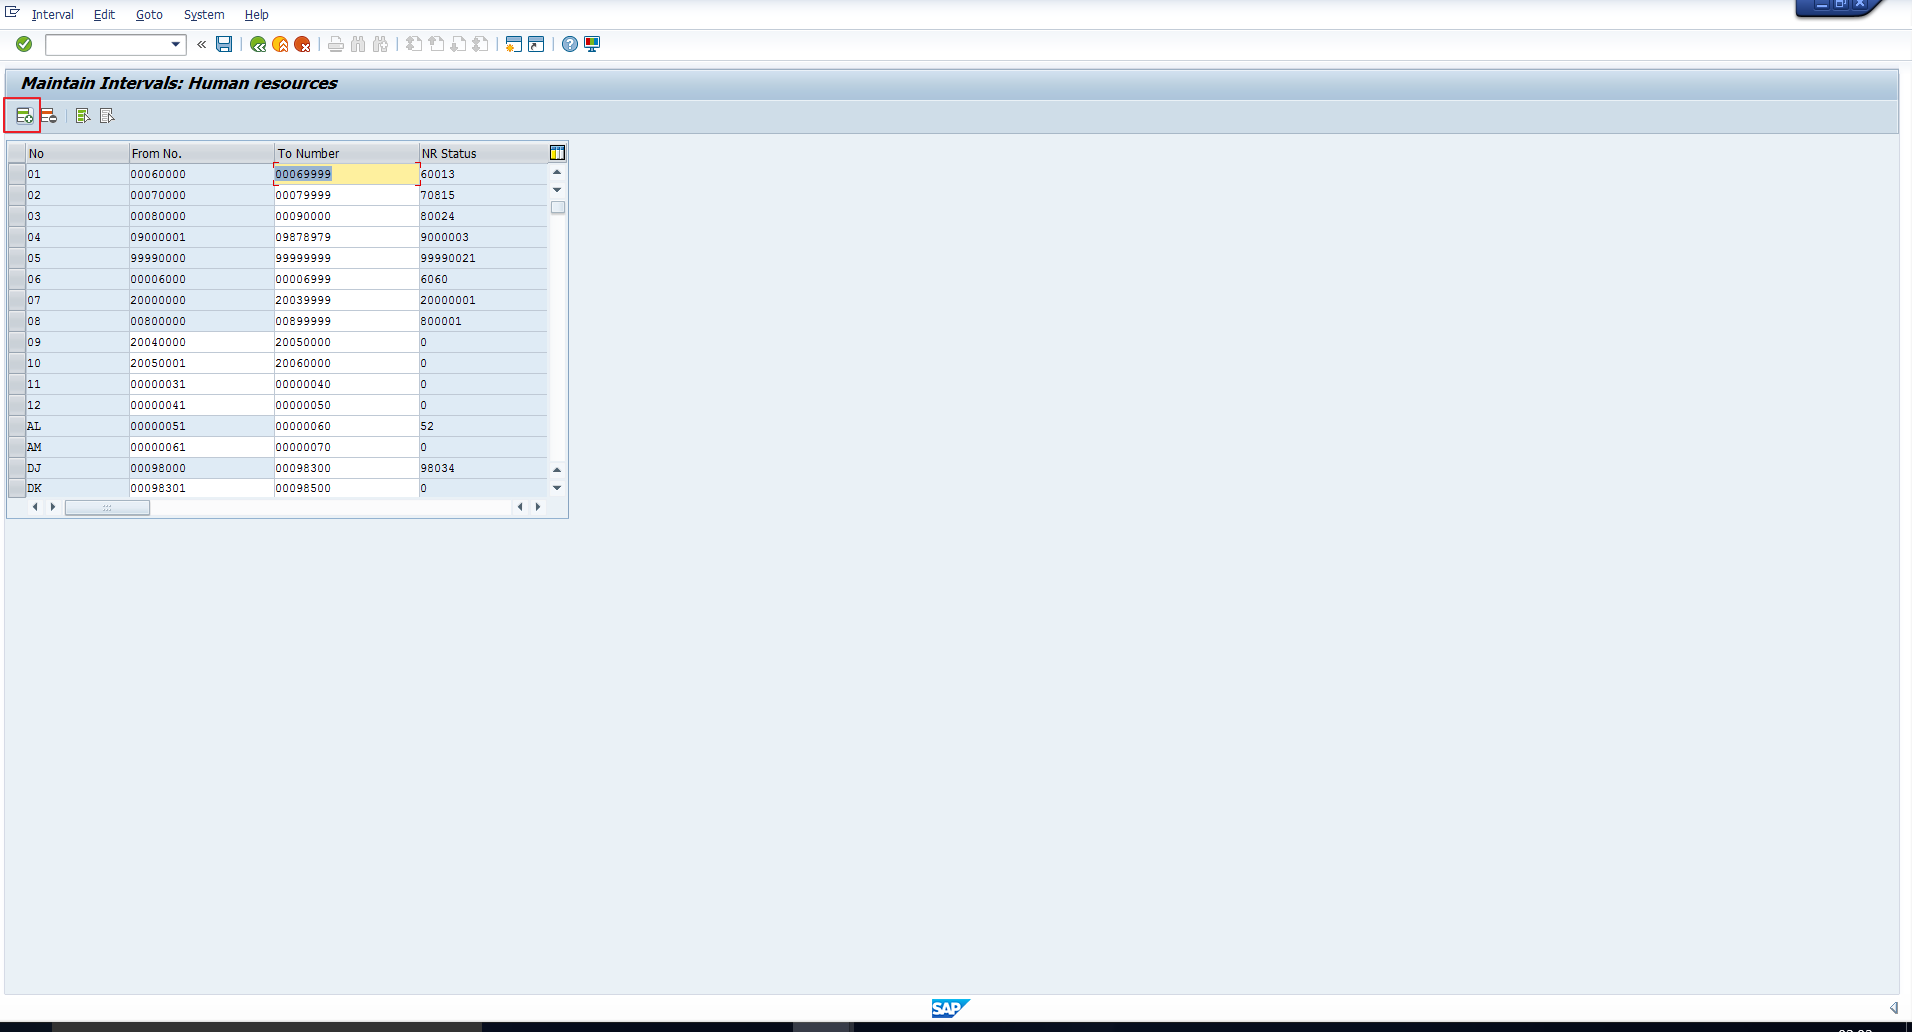
No. – This contains a two-character code to uniquely identify each interval.
From No. – This contains the lower limit of the interval.
To Number – This contains the upper limit of the interval.
NR status – This is relevant only for internal number ranges (NR). It contains the last assigned number. The system increments this by 1 when the next employee, for whom the number range is applicable, is hired.
Ext. – This flag is set to indicate that a number range is External.
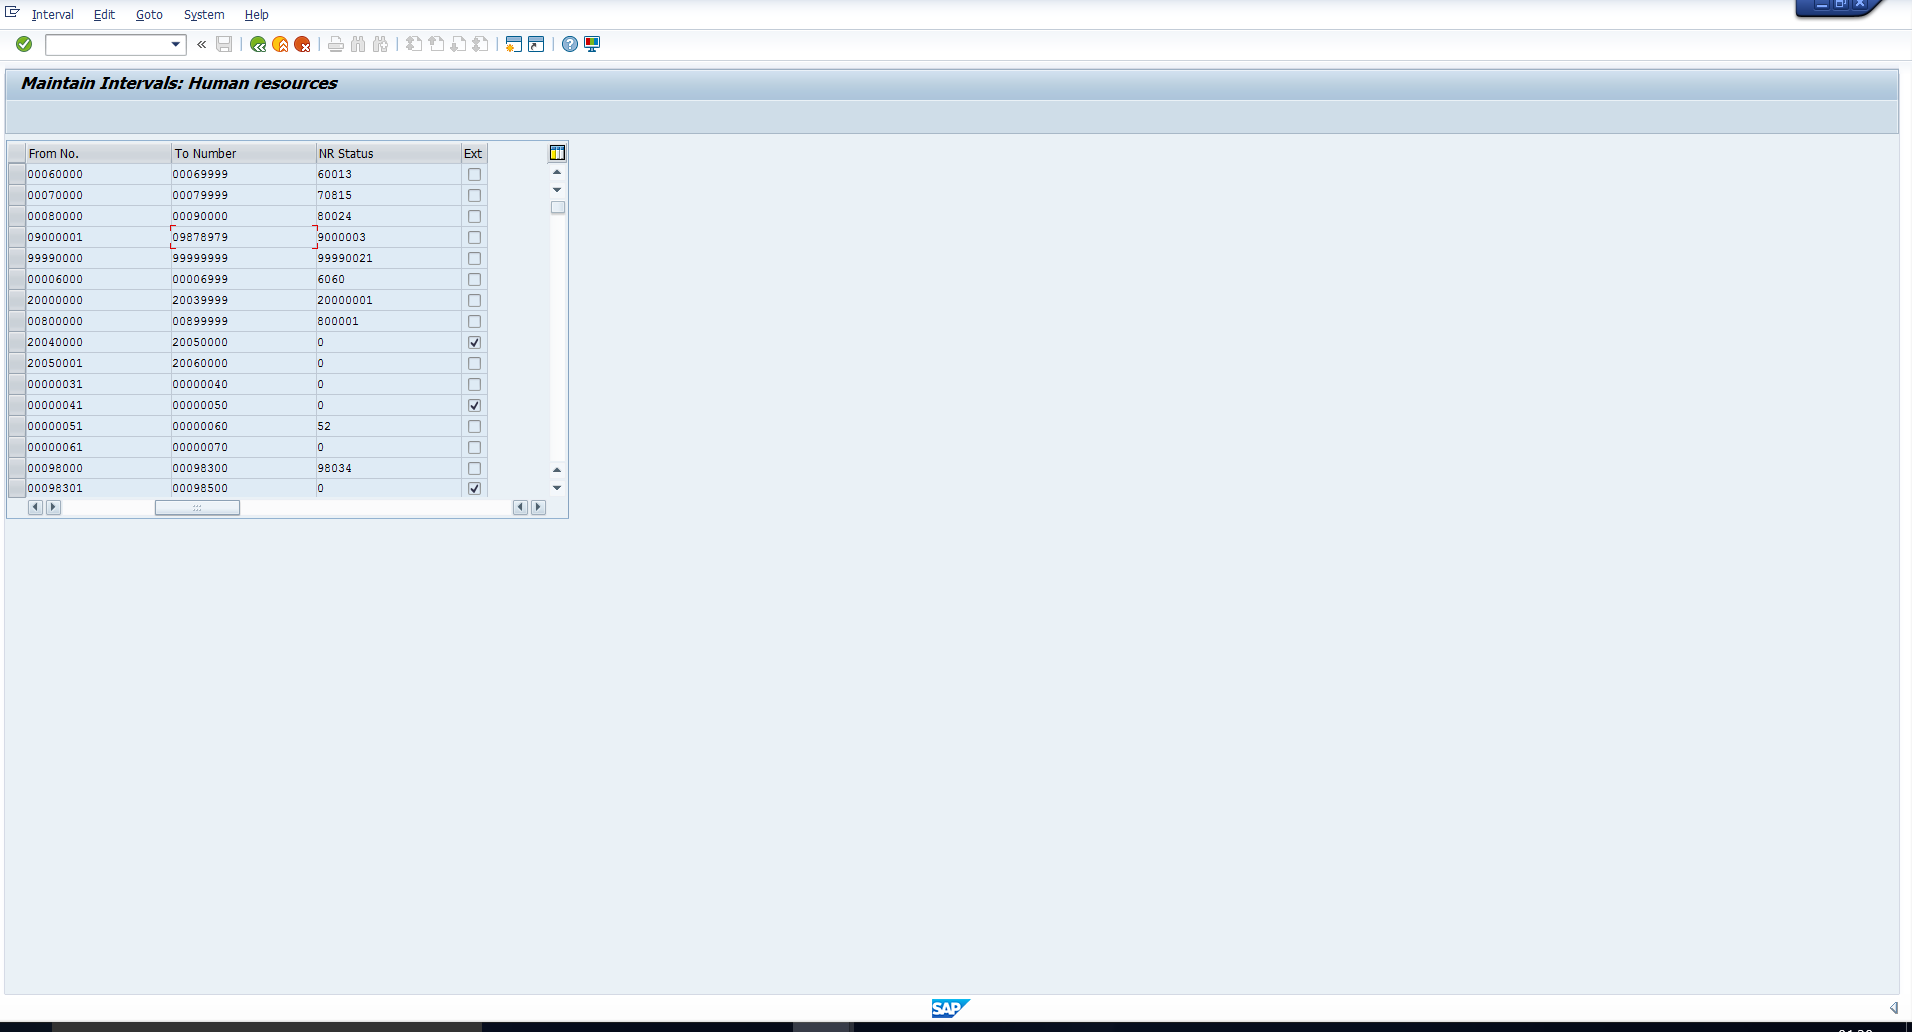
2. Change intervals. Clicking the second pushbutton takes you to the screen shown in screenshots below.

You can carry out the following changes in this screen:
- Edit the From number (if not already assigned)
- Edit the To number (if not already assigned)
- Select or deselect the Ext. flag (if the field NR status is 0)
3. Change Number Range status. The third pushbutton takes you to the screen shown in the screenshot below.
In this screen, you can change the value of the last assigned number. This is applicable to internal number ranges.
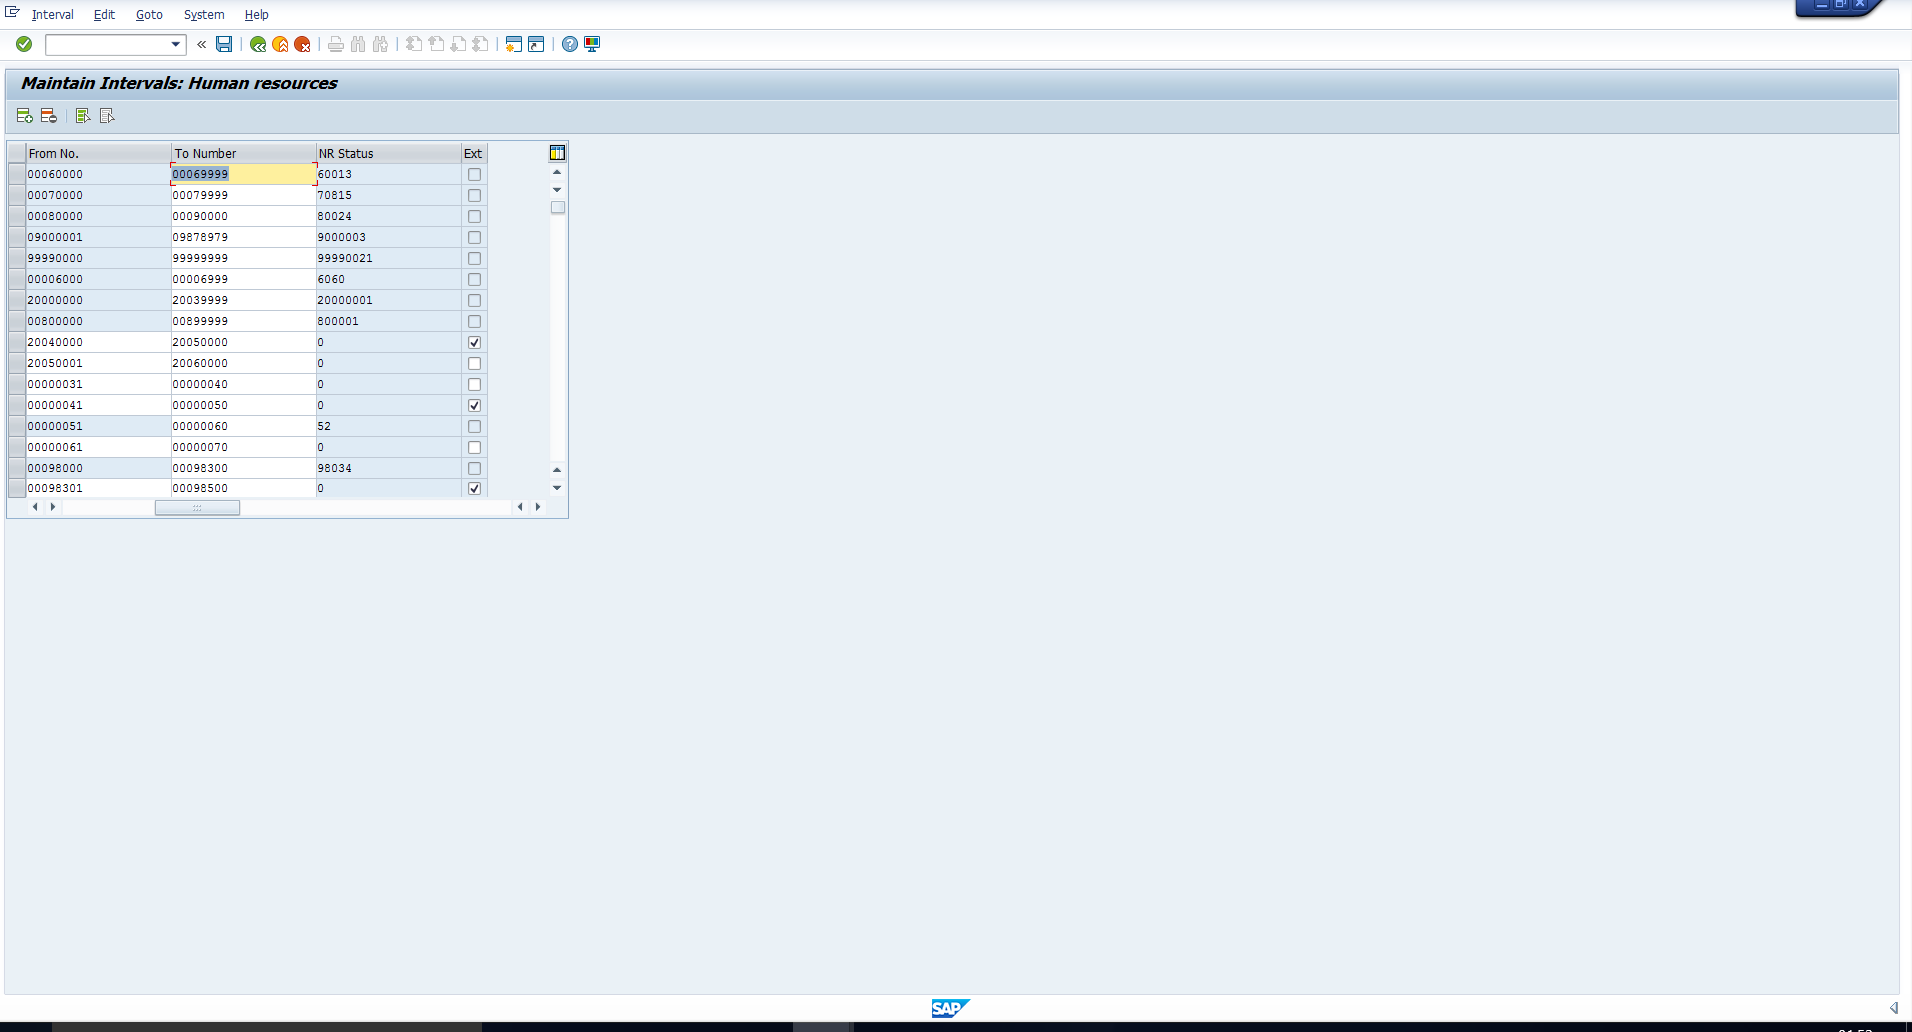
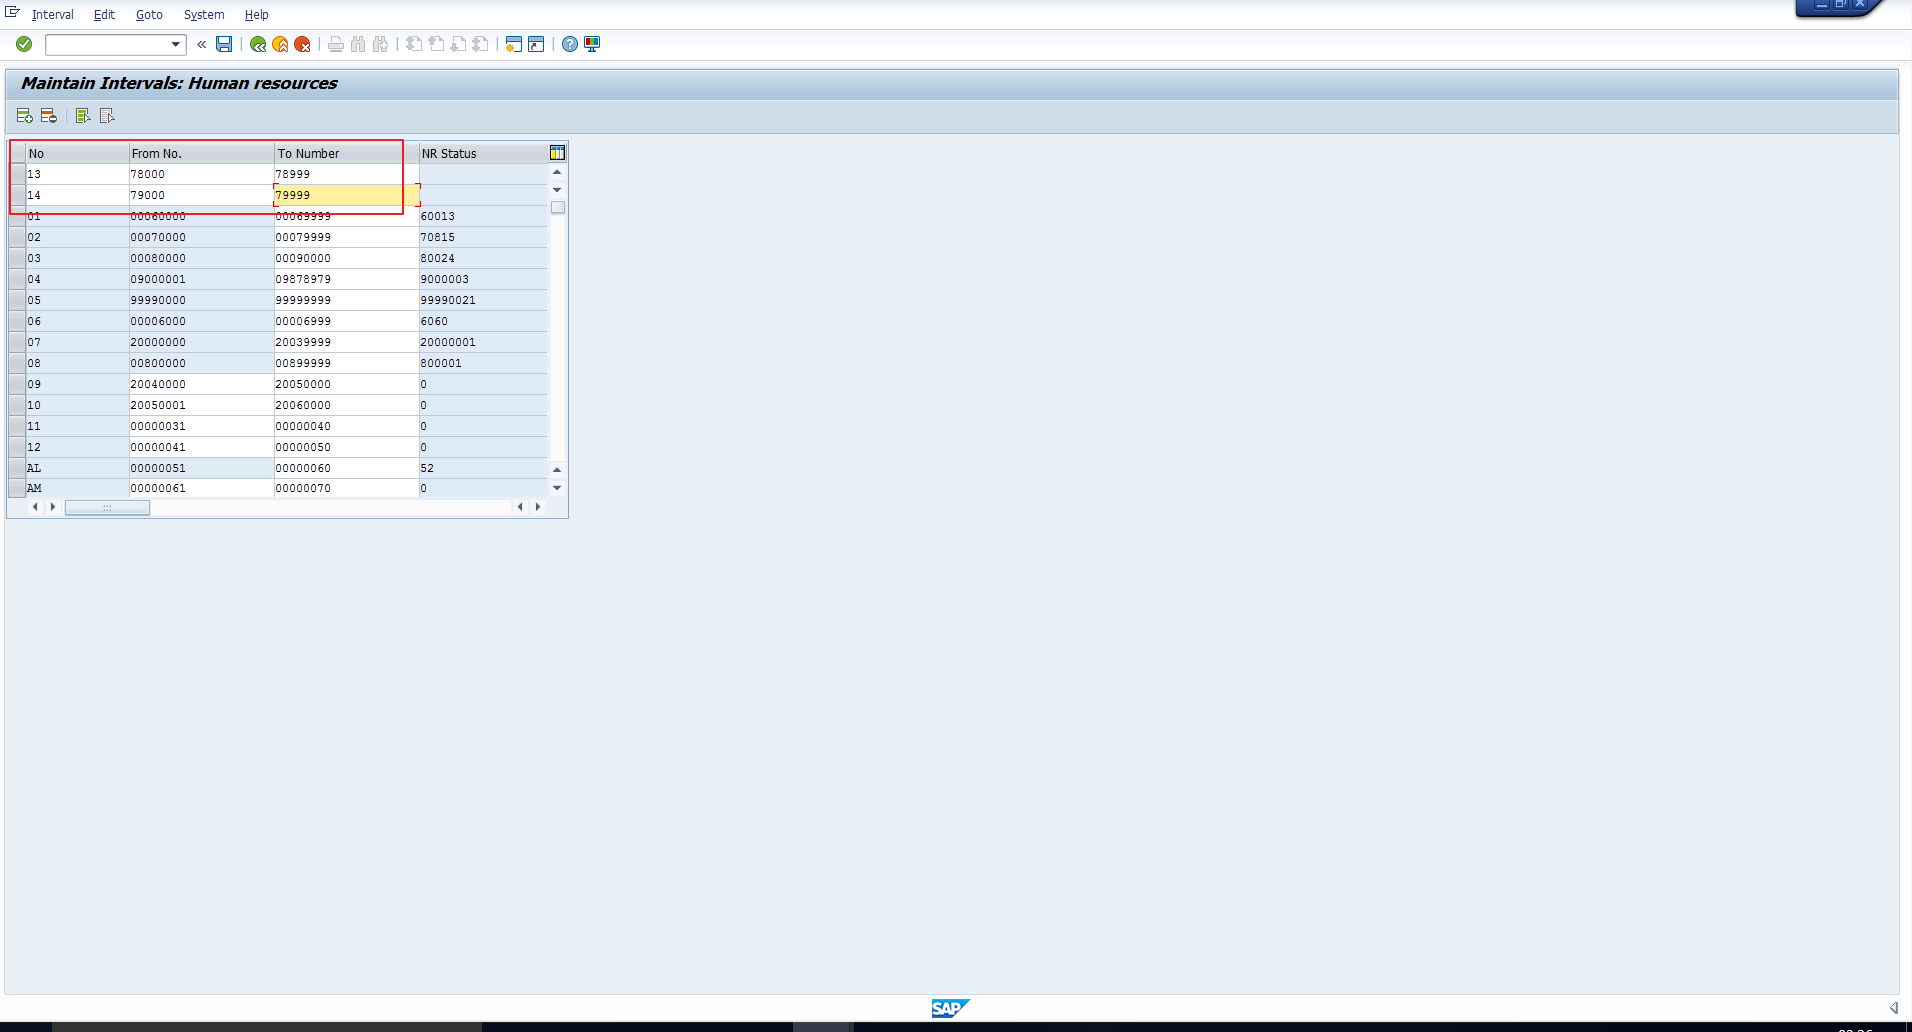
Now, for our requirement, we want to create two new intervals. Click on the Change Intervals pushbutton. In the next screen, click on the Insert Line icon as shown in the picture below. You will need to click this icon as many times as the number of new intervals that are to be added. In our case, click the icon twice, so that two intervals can be added.
Enter the required interval details as shown. Leave the Ext. flag unchecked in accordance with our requirement of internal numbering.
Then click on the Save icon.
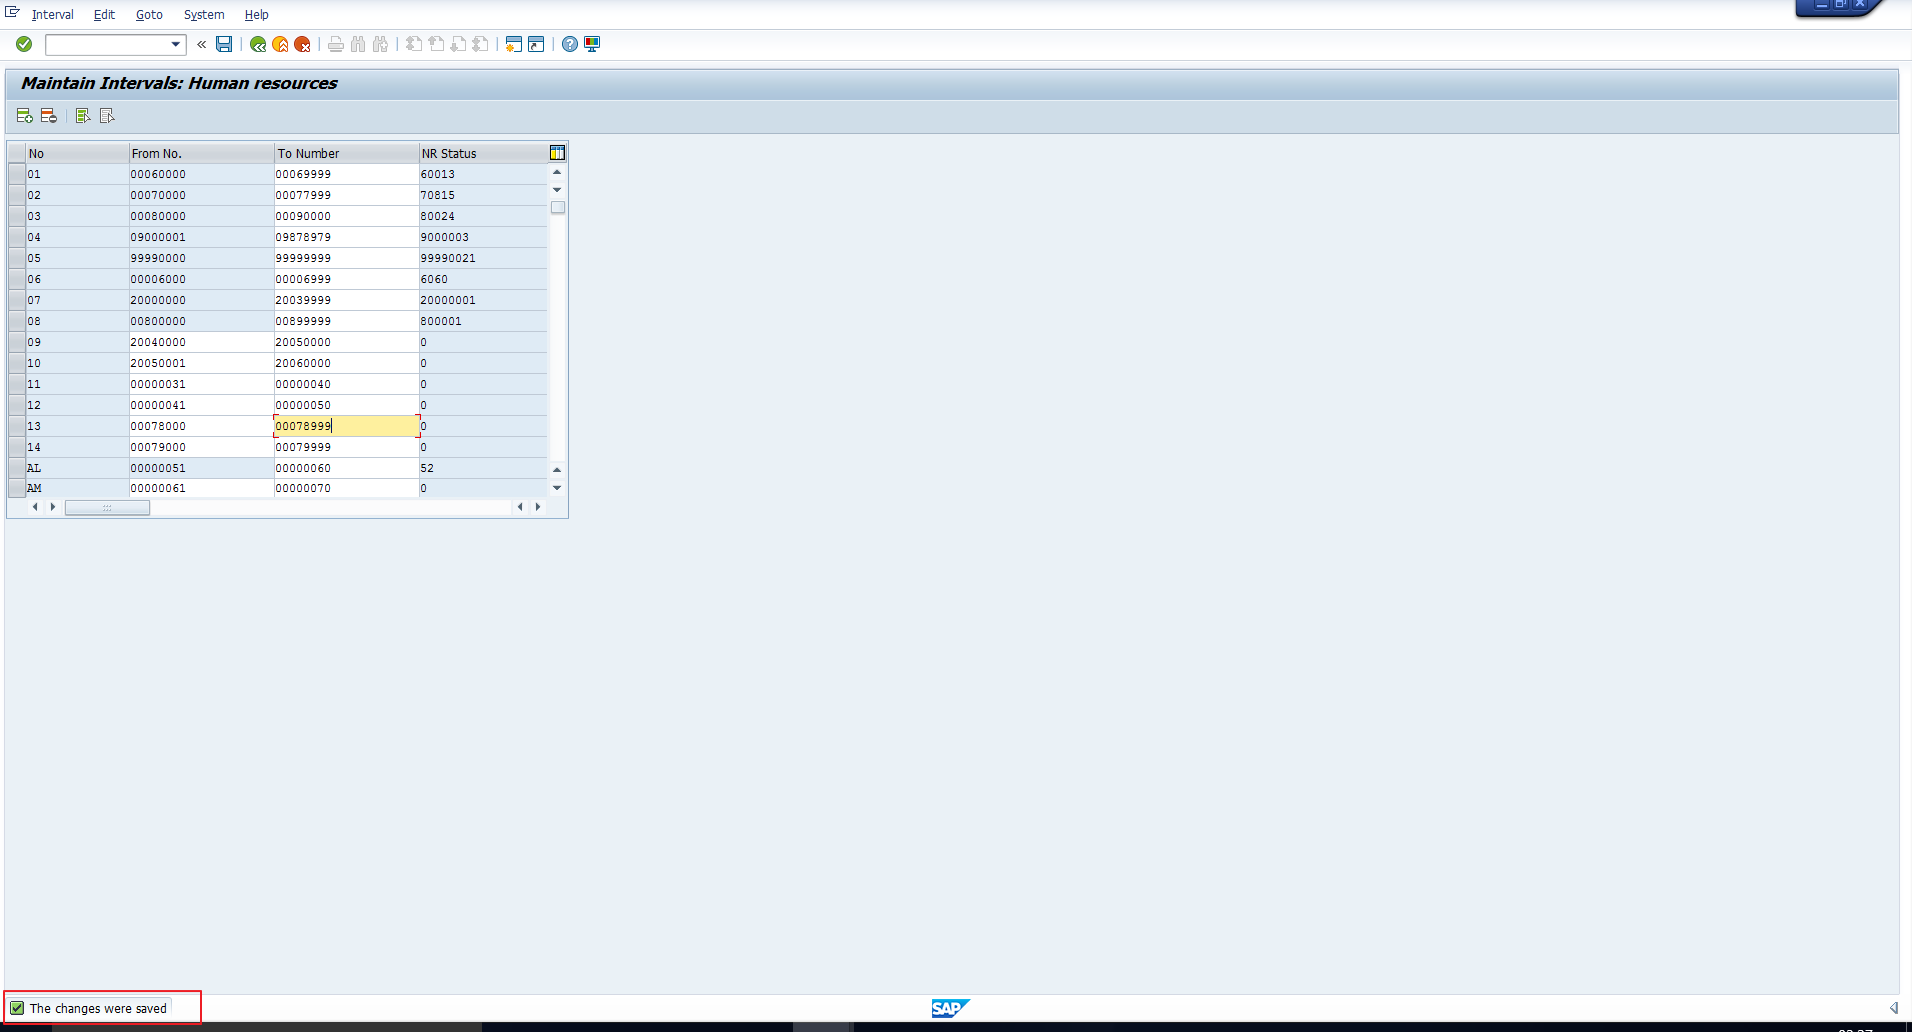
The two new intervals 13 (78000 – 78999) and 14 (79000 – 79999) have been created.
Update the NUMKR feature
We now need to update the NUMKR feature to default the number range 13 (78000 – 78999) for regular employees and 14 (79000 – 79999) for Pensioners.
There are two ways to reach this configuration node.
1. Enter transaction code SPRO and then follow the below mentioned customizing path
Personnel Management – Personnel Administration – Basic settings – Determine defaults for number ranges
This is shown in the screenshot below.

2. Enter transaction code PE03. Enter feature NUMKR. This directly takes you to the feature shown in the picture below.
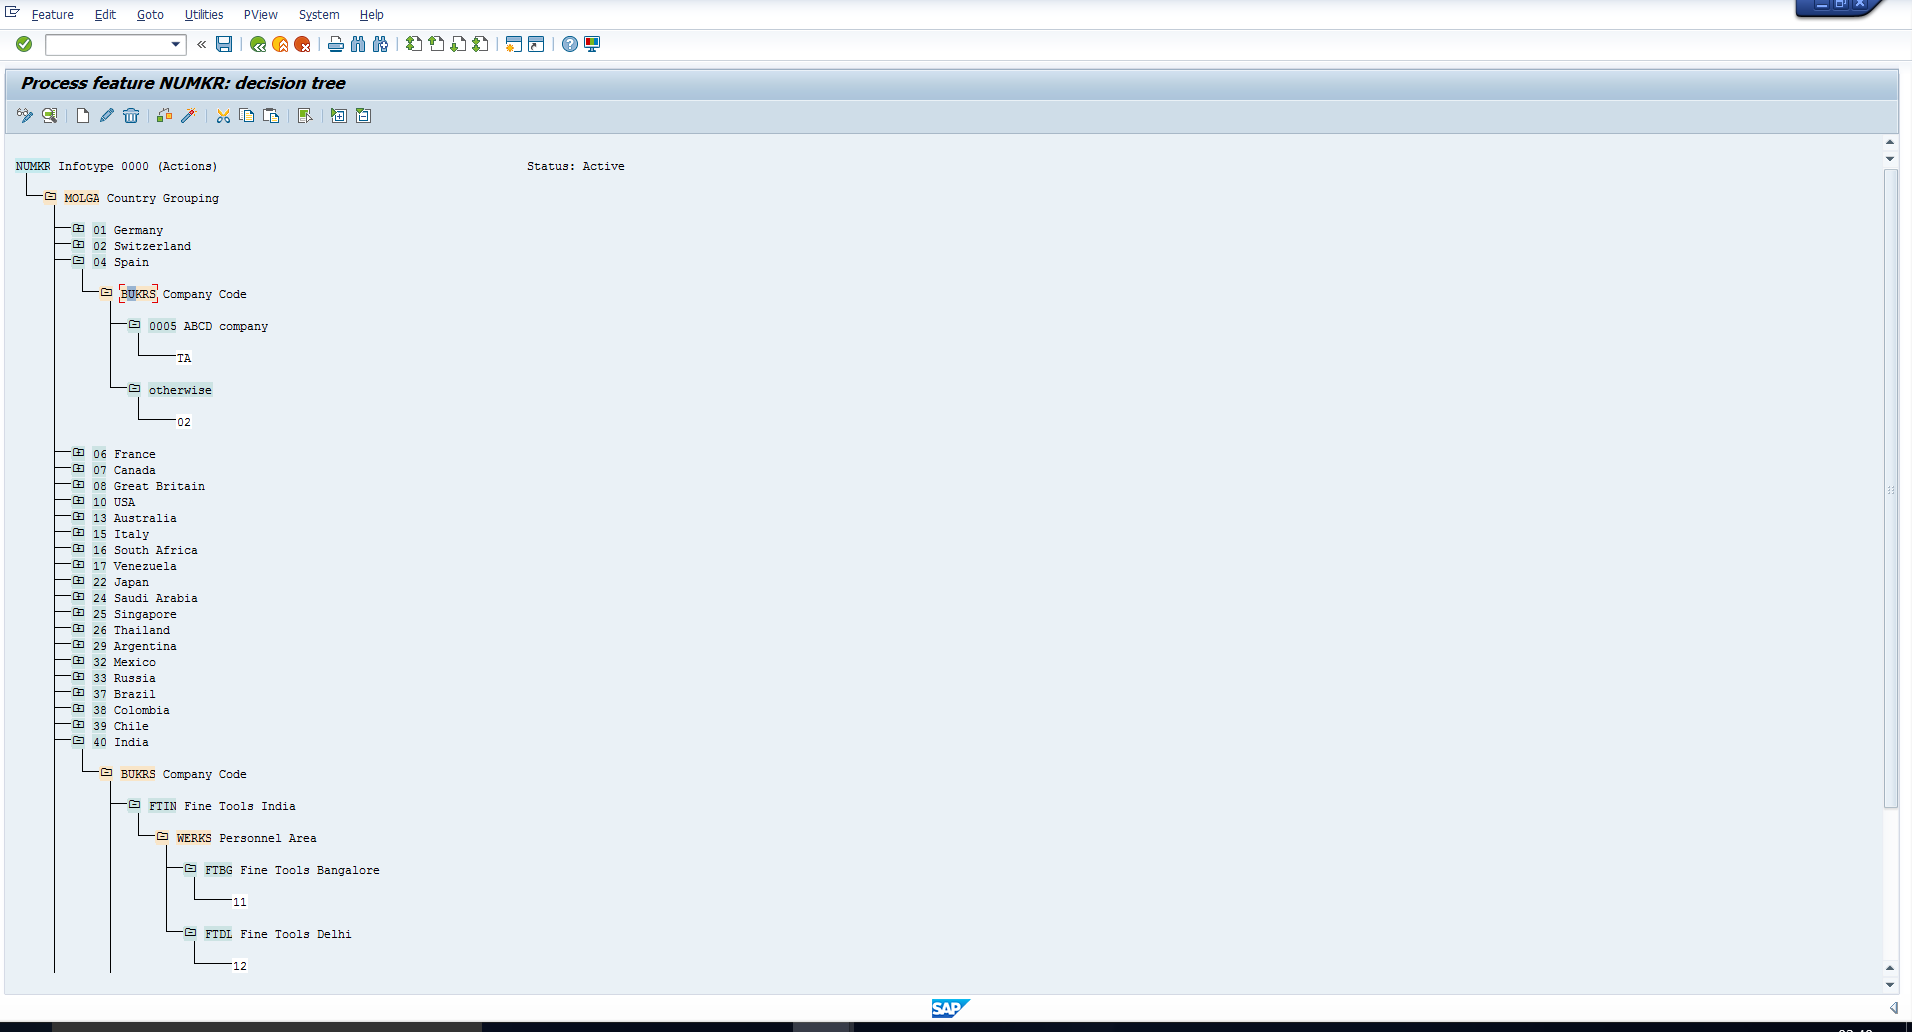
We need to make the below changes as shown in the next picture. To understand how to make these changes, please go through the tutorial on Features.
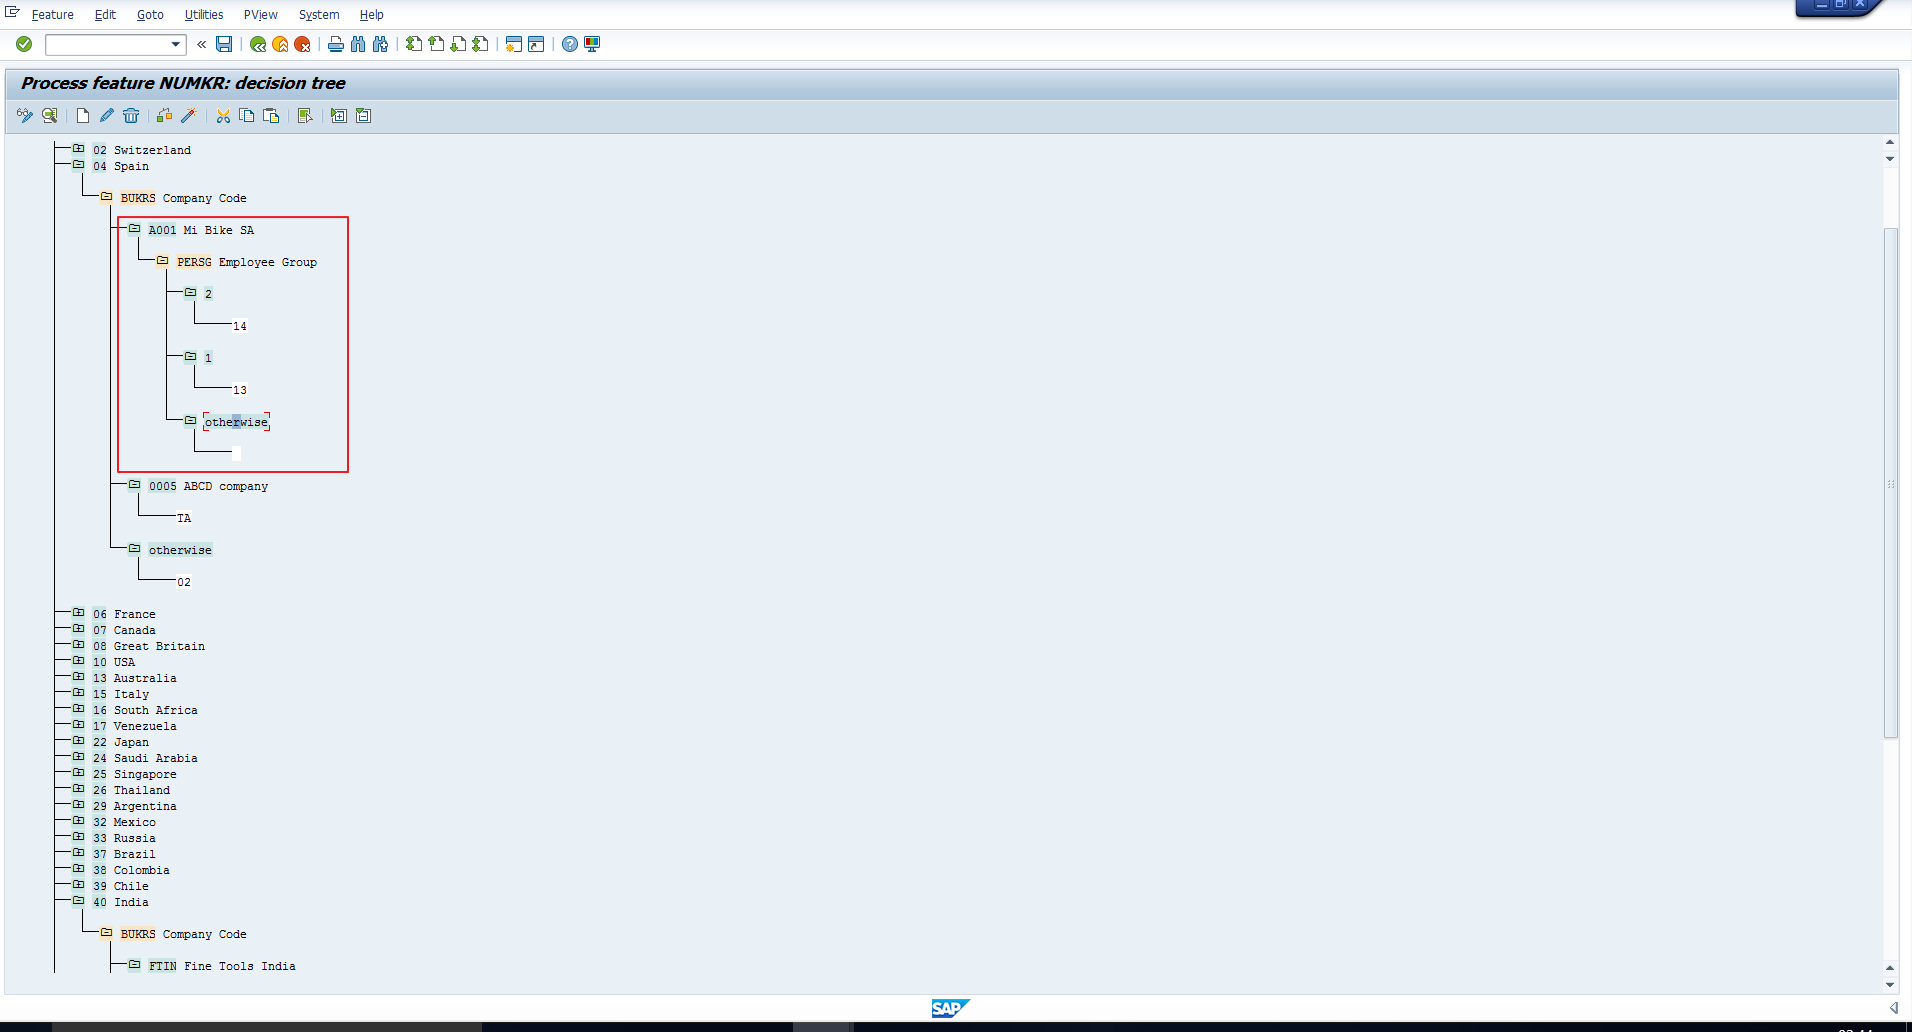
Let’s interpret the changes we have made. Our changes imply that for Country grouping 04 (Spain), if the company code is A001, the system will then check the Employee Group. If the Employee group is 1 (Regular employees), then the return value is 13. This means that for Regular employees, the system defaults the number range to 13 (78000 – 78999). If the Employee group is 2 (Pensioners), then the return value is 14. This means that for Pensioners, the system defaults the number range to 14 (79000 – 79999).
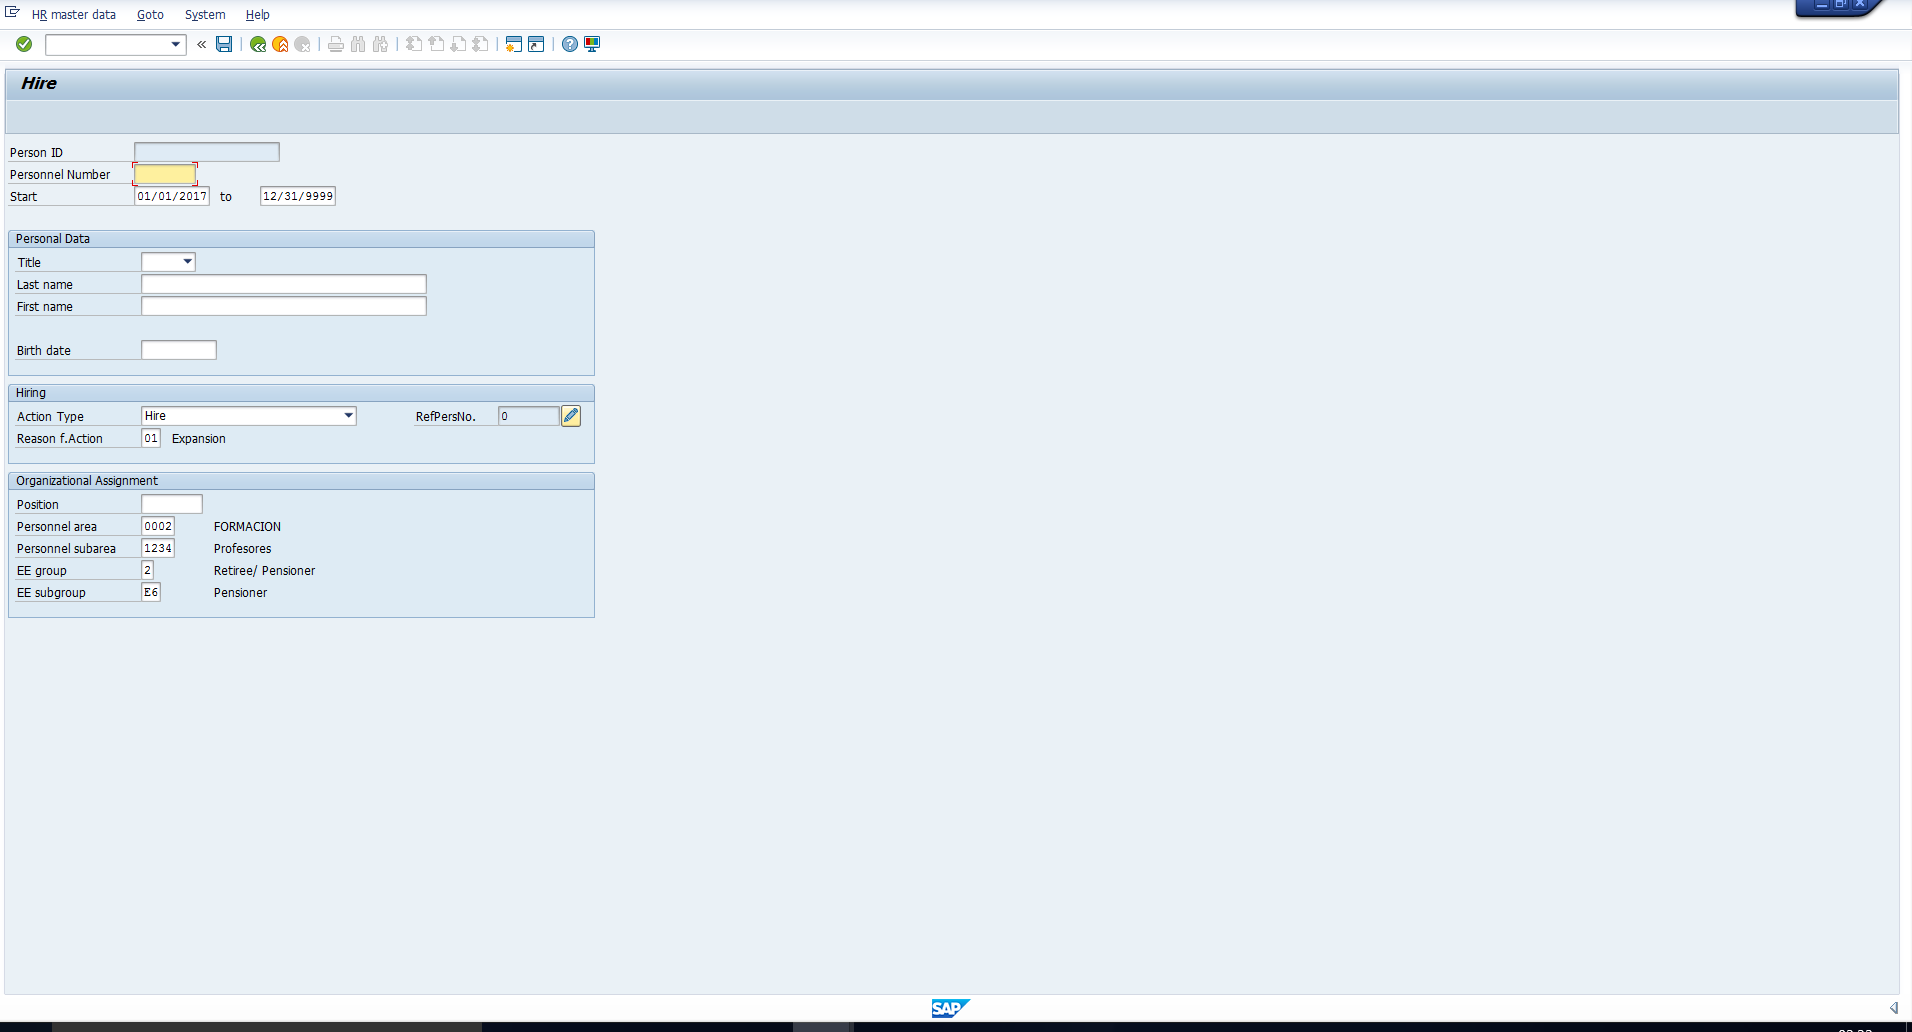
Let’s test our changes by hiring two employees using the transaction code PA40.
1. Regular employee. Select the Hire action as shown in Figure 14. Leave the Personnel Number blank as this will be internally generated as per the number range.

Enter the Organizational assignment details and assign the employee to Employee group 1 (Employee).
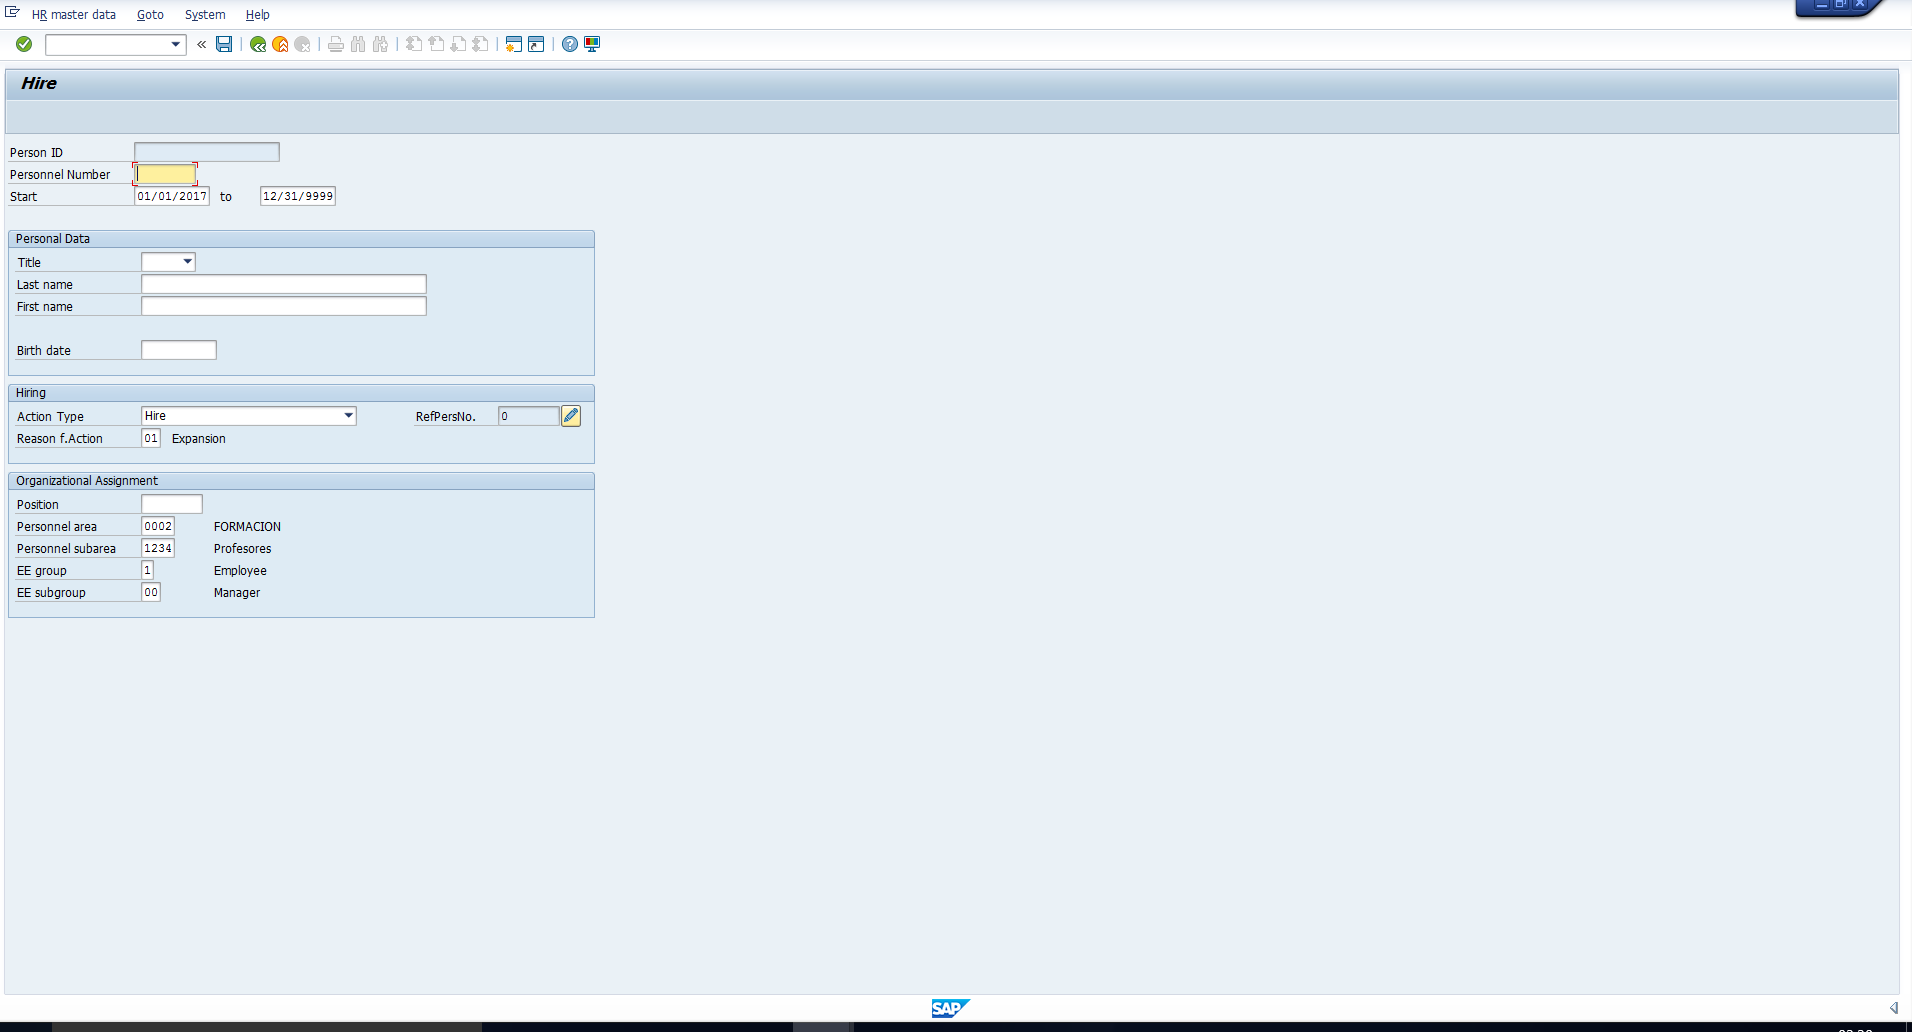
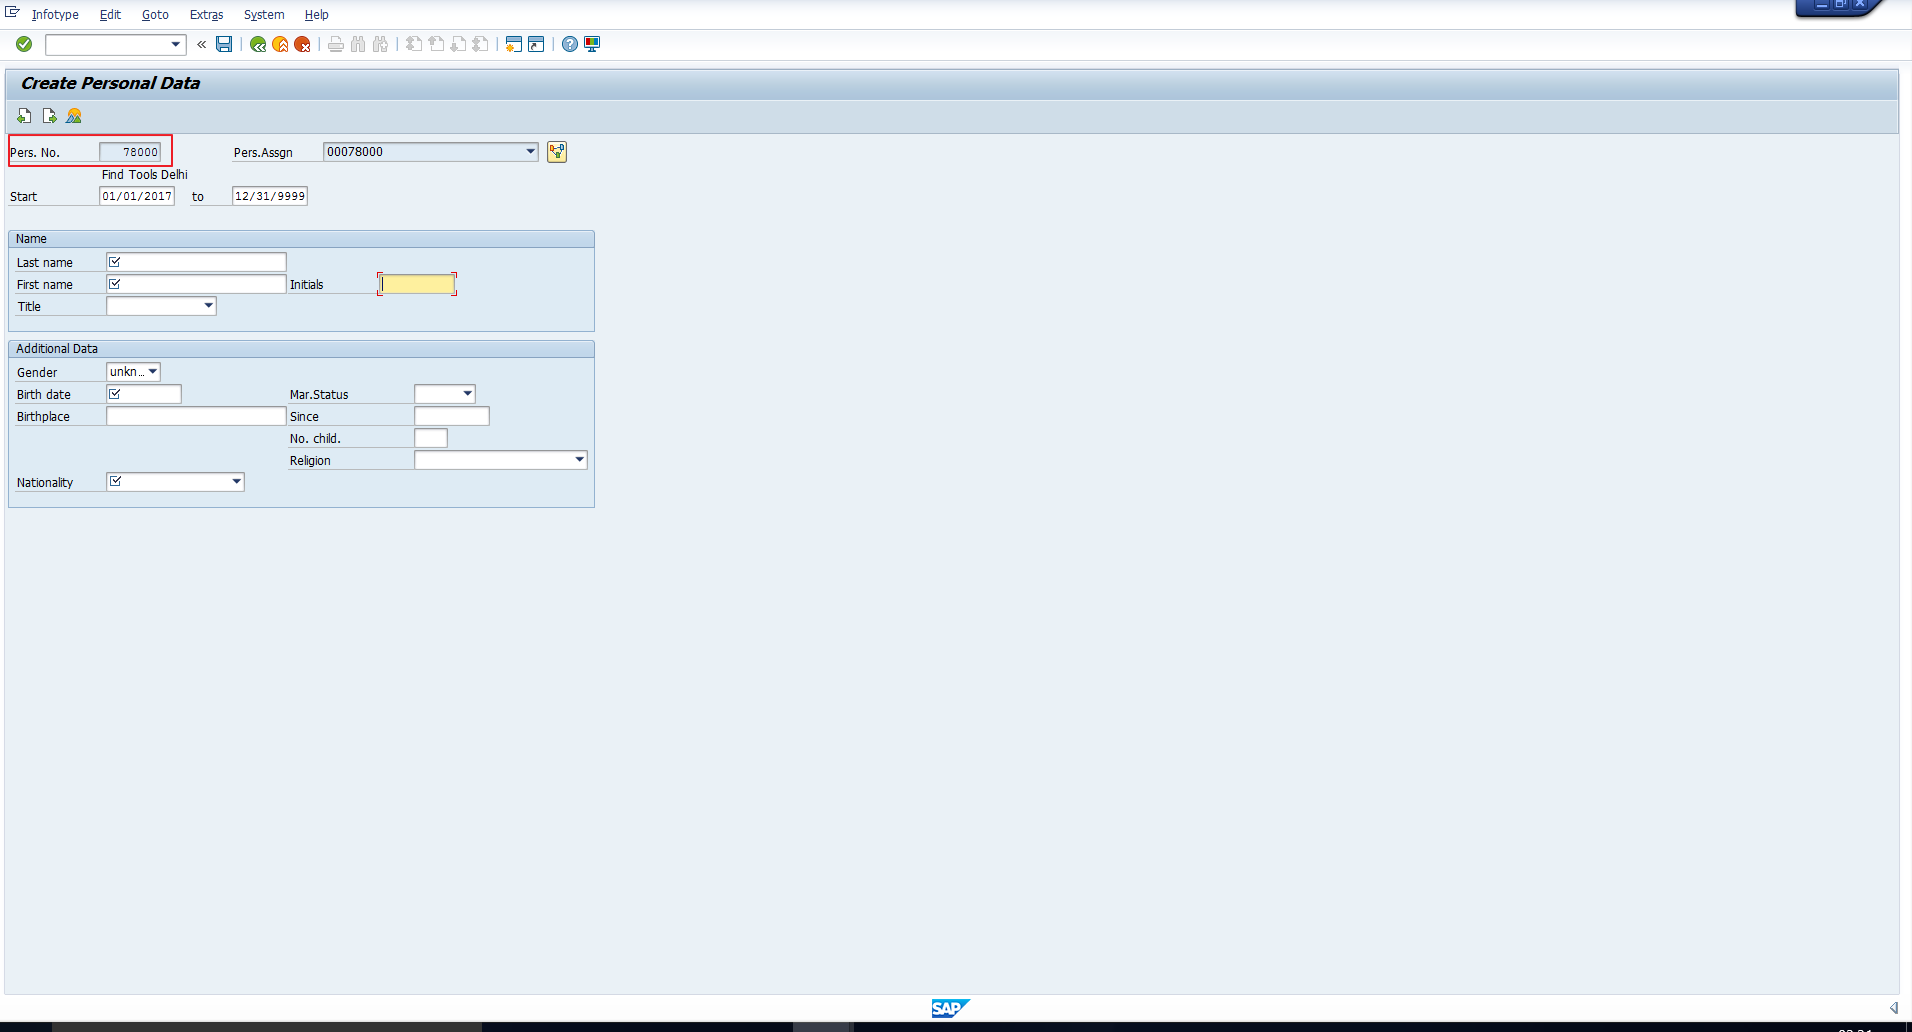
On saving, the Personnel number is internally assigned as 78000 which is as per our requirement for Regular employees.
2. Pensioner. Select the Hire action. Leave the Personnel Number blank as this will be internally generated as per the Pensioner number range.

Enter the Organizational assignment details and assign the employee to Employee group 2 (Pensioner).
On saving the data, the Personnel number is internally assigned as 79000 which is as per our requirement for Pensioners.

We can go back to check the intervals using transaction PA04. The NR status is updated to indicate the last personnel number assigned.
—
Did you like this tutorial? Have any questions or comments? We would love to hear your feedback in the comments section below. It’d be a big help for us, and hopefully it’s something we can address for you in improvement of our free SAP HR tutorials.
Navigation Links
Go to next lesson: SAP Personnel Administration Reports
Go to previous lesson: SAP Fast Entry
Go to overview of the course: SAP HR Training
What is the Return value For Country Groupin in PA SAP HR?
How it will Give?
Thank you for this great lessons!
Thank you for this tutorial. I have one question, can you please clarify?
After assigning new number range in PE03 & PA04, while transporting the same to PRD, whether NR status will get copied or ignored?? Because in PRD, NR status will be the actual, then in the DEV.