
 In this tutorial we discuss SAP transaction code FBCJ — the cash journal. The SAP FBCJ cash journal can be used to record all transactions involving cash in place of posting a journal entry via transaction code FB50. There are certain business transactions predefined to post in the cash journal, such as cash receipts, cash expenses, cash withdrawal from bank, etc. It is the online cash book for posting such transactions as a single screen entry in SAP. It also calculates the balance of cash available with the firm after each cash receipt or payment is posted and allows the user to print a cash journal document. Thus, the SAP FBCJ cash journal provides the cash position of an organization. We present the cash journal in this tutorial from an end-user perspective. For deeper knowledge, check out our SAP cash journal configuration tutorial and other articles in our free online SAP FI training.
Why Use the Cash Journal?
Here we list the important advantages of using the SAP FBCJ cash journal:
- Ability to post all transactions related to cash receipts and payment in a single screen
- Daily, weekly or current period reporting available
- Daily cash position, including opening balance, total receipts, total payments and closing balance, is automatically calculated by the system
- Cash journal can be printed easily
- Entries are very quick and easy via customized business transactions
- Two-step procedure of save then post helps avoid mistakes
- Saved cash journal transactions can be deleted with proper authorization
- Single-screen layout allows for easy entry, display and change
- Prevents negative cash balance
- Very simple to configure
SAP FBCJ Cash Journal Introduction
In this section, we show you how to access the cash journal and acquaint you with the features, tabs and fields of the transaction.
| Menu path | Accounting – Financial Accounting – Banks – Incomings – Cash Journal |
| Transaction code | FBCJ – Cash Journal |
If this is your first time using the cash journal, you will receive a screen prompting you to enter a company code and cash journal. Enter a value for each and hit Enter. These values will be retained for your next session, but can be changed as we will described later.
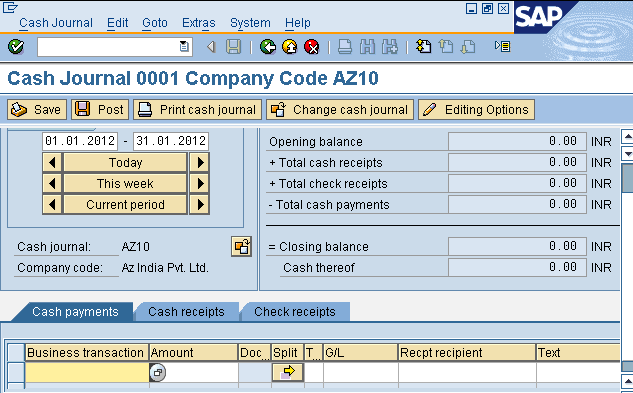
The initial screen of transaction code FBCJ is effectively the only screen, but there are tabs for cash payments, cash receipts and check receipts as shown below:
First, let’s define the functionality of the toolbar features in the SAP FBCJ cash journal, which appear as buttons near the top of the screen:
- The Save button
 is used to save the cash journal transaction.
 - The Post button
 is used to post the transaction in the cash journal. Posting the transaction generates a document number.
 - We can also take the printout of the cash journal using the Print cash journal button
 .
. - Use the Change cash journal button
 to record transactions in a different cash journal than the one defaulted.
 - The Editing Options button
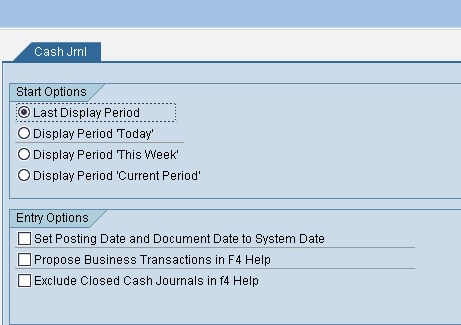
 provides us with options to record transactions in the cash journal, depending on the business requirement.
The screen for the cash journal editing options feature is shown below:
Now, take a look at the tabs that occupy the middle of the cash journal screen. Let’s walk through the use of each tab:
- Cash payments: Cash payments are the payments made towards small purchases like low-dollar office supplies.
- Cash receipts: Cash receipts are small cash receivables from cash sales, cash withdrawals or other cash incomes. The income from cash receipts are used as petty cash for mitigating small cash expenses and payments.
- Check receipts: For receipts in the form of check, record the transaction in the cash journal, then present the check to the bank.
Further, within each tab lies a set of fields. These fields vary depending on which tab is selected. There are many, but let’s define the common fields to understand their use:
- Business transaction: This specifies the type of transaction entered in the cash journal. Each line in the cash journal must be classified as a predefined business transaction. Additional business transactions may be configured.
- Amount: Here we enter amount of transaction.
- Doc.Stat. Document status indicates whether the document is posted or not. A red status indicates that the transaction has been entered, yellow shows that the transaction has been saved, while green signifies that the transaction has been posted as an accounting document.
- Tax Code: Enter a tax code if applicable.
- G/L: The G/L account is populated automatically based on the configuration of the business transaction.
- Receipt Recip.: A free-text recipient name can be entered here.
- Text: A short description of the transaction can be given here.
- Doc. Number: This field is populated once the transaction is posted.
- Net amount: This is the amount after tax.
SAP FBCJ Cash Journal Process
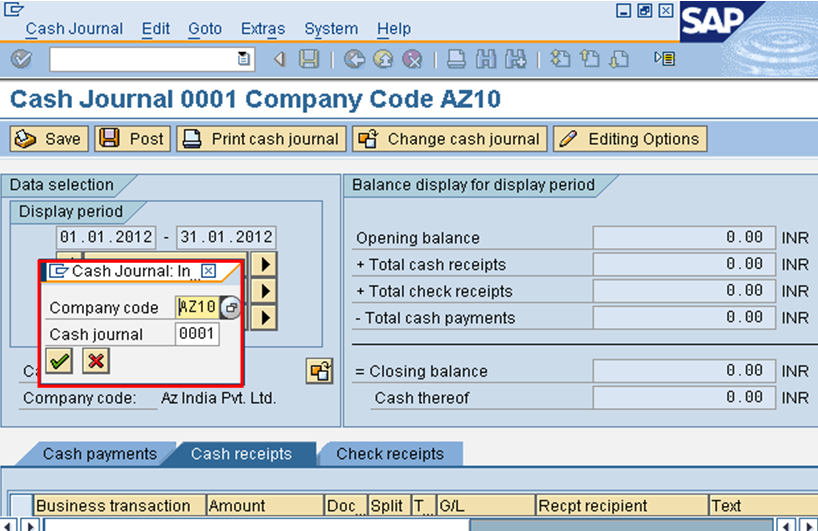
Prior to posting the transaction we need to select the proper cash journal and company code. Suppose you want to post a transaction in company code AZ10 and cash journal 0001. Click the Change cash journal icon ![]() and update the fields, as demonstrated below:
and update the fields, as demonstrated below:
Let’s walk through the process of posting cash journal transactions by demonstrating a posting for each tab.
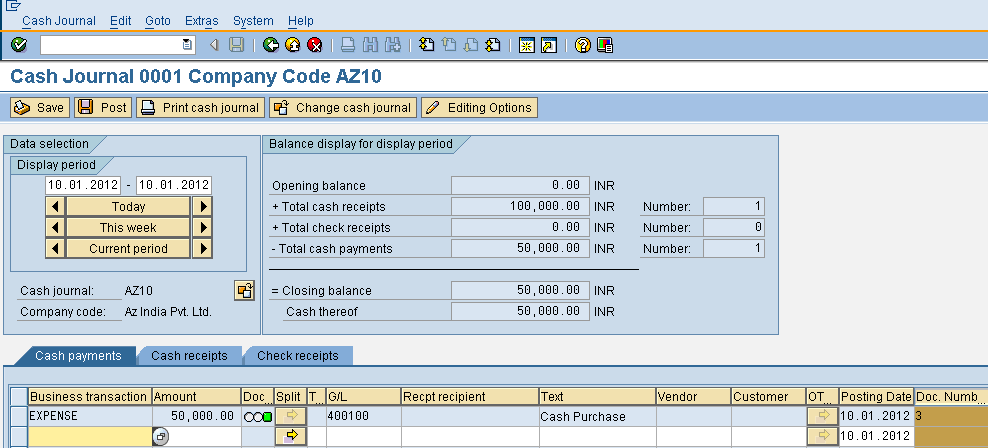
Post Cash Payments
Recall that cash payments are the payments made for small purchases, such as low-dollar office supplies. Click on the tab Cash payments and enter the following information:
- Classify the payment by selecting the appropriate business transaction
- Enter transaction amount
- Specify tax code for the output sales, if necessary
- Enter a short description in the Text field
You may also enter information in other fields as business requirements dictate.
Press Enter. The fields G/L and Doc.Stat. will automatically be updated with the G/L account and document status, respectively. The red document status shown below indicates that the document is neither saved, nor posted yet:
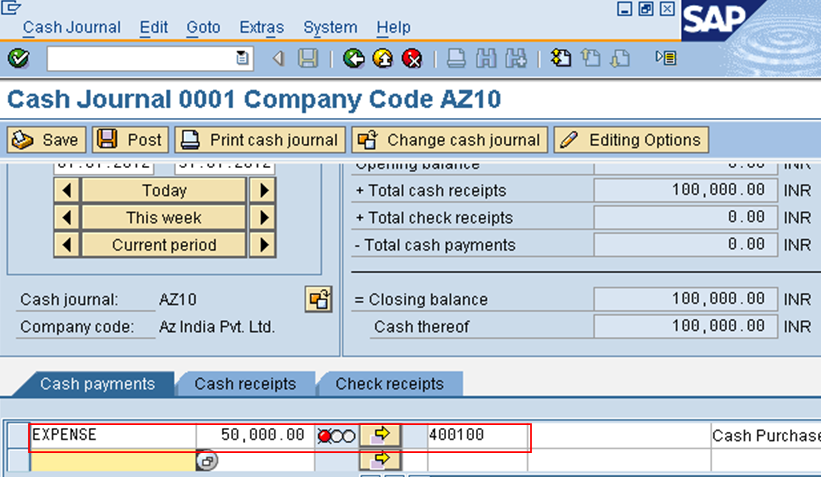
Let’s post this transaction straightaway using the Post icon ![]() . At this point a document number is generated and updated in the Doc. Number field. Also, the Doc.Stat. field becomes green, as shown below:
. At this point a document number is generated and updated in the Doc. Number field. Also, the Doc.Stat. field becomes green, as shown below:
Post Cash Receipts
Now click on the tab Cash receipts. Remember that cash receipts are small cash receivables from cash sales, cash withdrawals or other cash incomes. Enter the same information as required for cash payments, as well as any other fields per your business requirements.
Press Enter. Again, the G/L account will automatically be populated and the document status will change to red, as shown below:
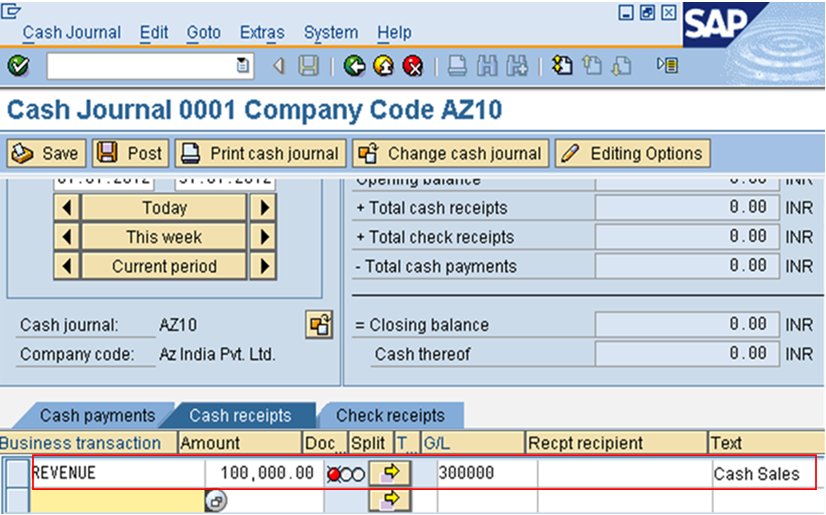
This time, let’s save the transaction to preserve the entries for later posting. Press the Save icon ![]() . At this stage, the transaction can still be adjusted or deleted, if necessary. The Doc.Stat. field becomes yellow, as highlighted below:
. At this stage, the transaction can still be adjusted or deleted, if necessary. The Doc.Stat. field becomes yellow, as highlighted below:
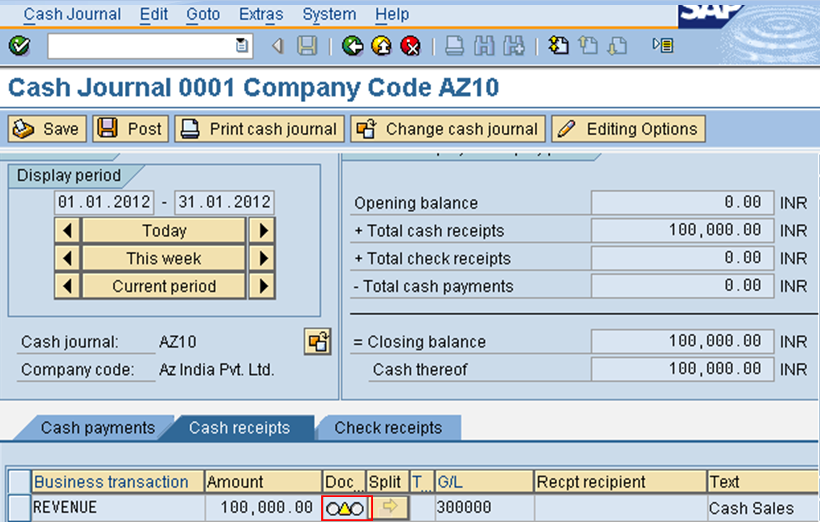
When you are ready to post the transaction, press the Post icon ![]() . As with the cash payment posting, a document number is generated and the document status becomes green.
. As with the cash payment posting, a document number is generated and the document status becomes green.
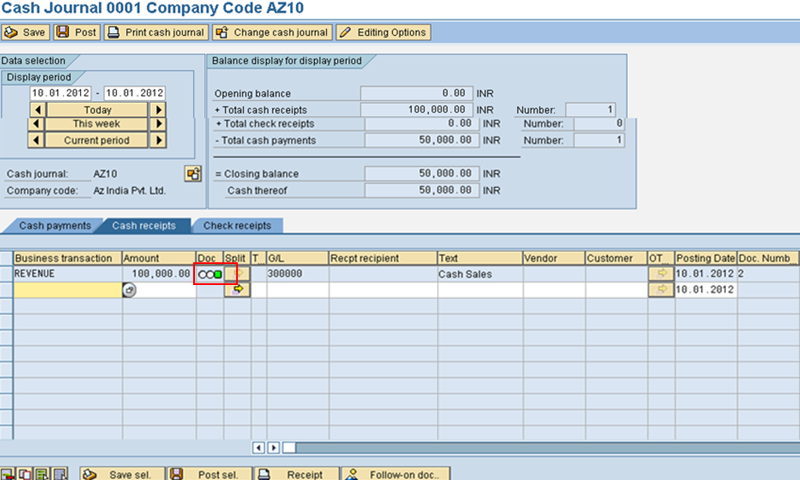
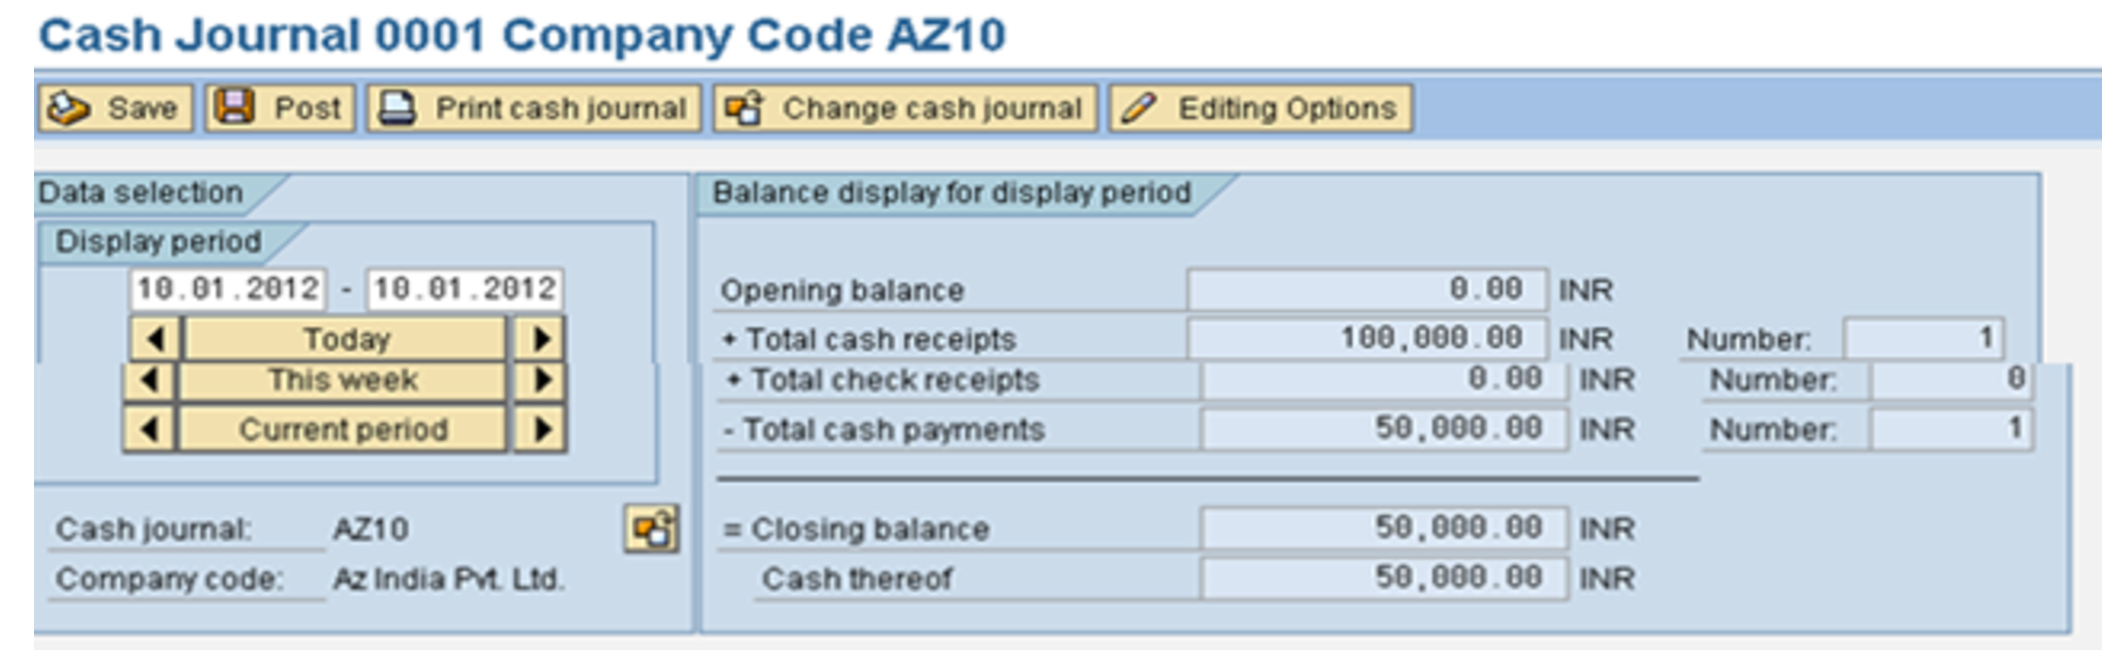
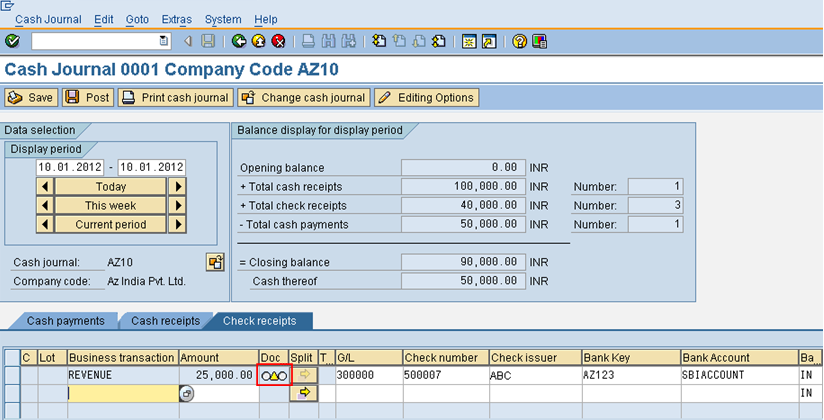
The Balance display for display period section shows the total payments and total receipts to calculate the closing balance. In our example, we have a 0 INR opening balance, with receipts of 100,000 INR and payments of 50,000 INR, so the closing balance is 50,000 INR.
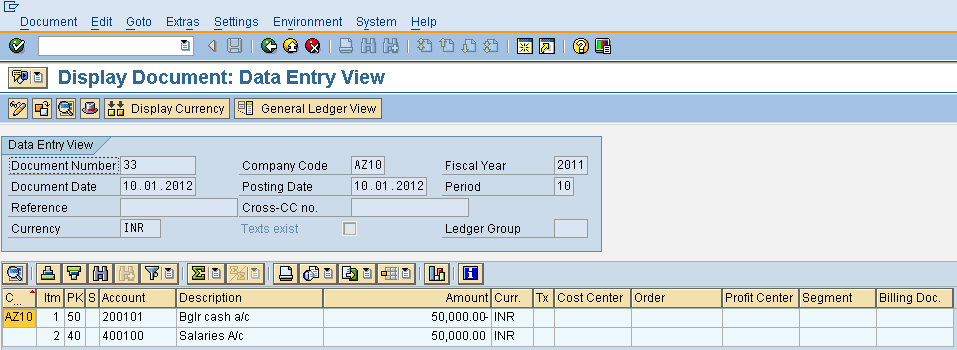
To display the accounting document related to each entry, highlight the row of the transaction, then click the Follow-On Docs icon ![]() at the bottom of the screen. Double click the Accounting document option in the pop-up screen.
at the bottom of the screen. Double click the Accounting document option in the pop-up screen.
For our example, the cash payment accounting document is displayed below:
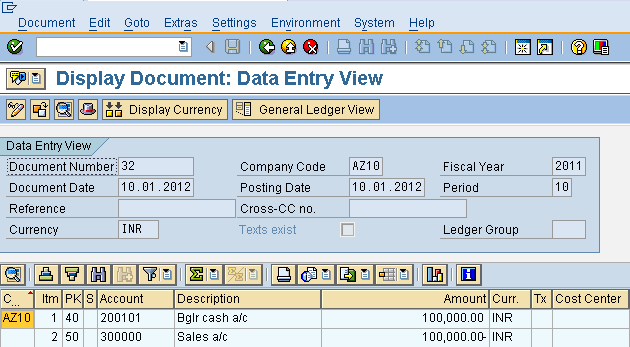
Respectively, our cash receipt accounting document is shown below:
Post Check Receipts
Now, let’s see how to use the SAP FBCJ cash journal for check receipts. Click on the tab Cash payments and enter required information, taking care to specify required information as follows:
- Classify the payment by selecting the appropriate business transaction
- Enter transaction amount
- Specify tax code if necessary
- Identify the check number
- Enter the name of the check issuer
- Specify the bank key
- Enter a short description in the Text field
Press Enter. Again, the G/L account will automatically be populated and the document status will change to red, as shown below:
Save the transaction by pressing the Save icon ![]() and see that the document status becomes yellow:
and see that the document status becomes yellow:
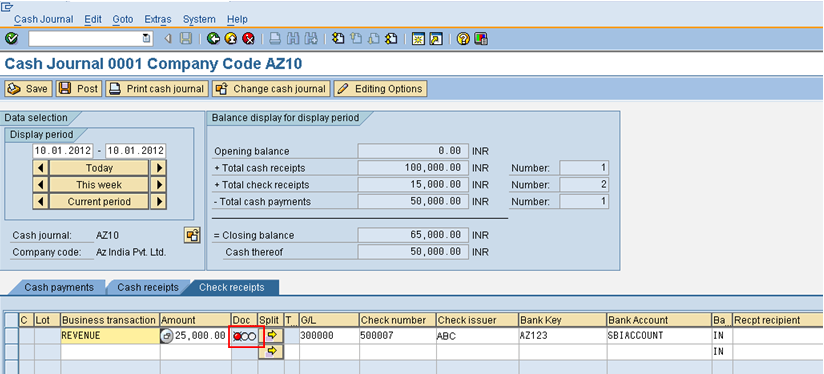
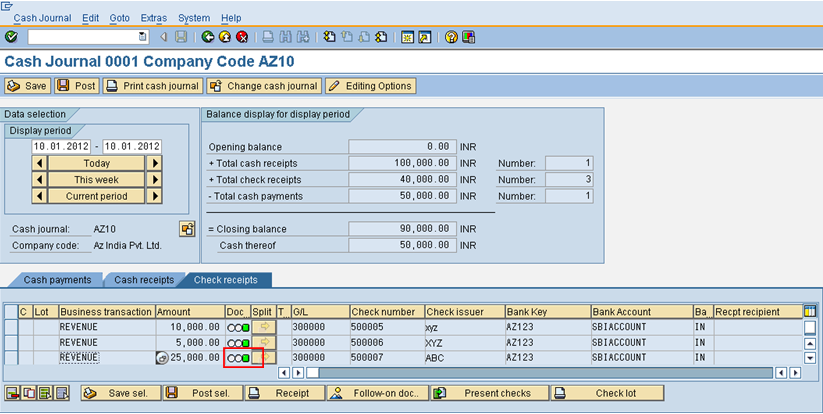
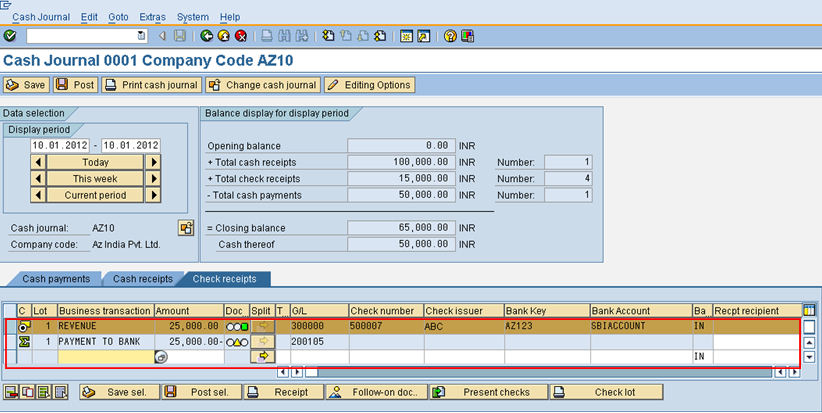
Let’s assume we have received several checks on the same day. We can post additional transactions within the same screen. Simply add more lines following the process above. You can post them all at once or separately using the Post icon ![]() . For example, below we have posted three separate check receipts totalling 40,000 INR:
. For example, below we have posted three separate check receipts totalling 40,000 INR:
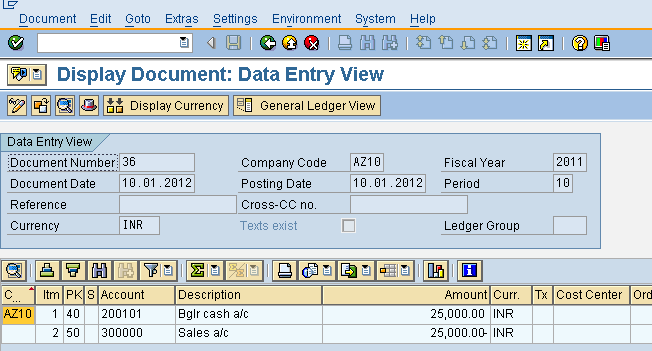
To display the accounting document, highlight the row of the transaction and click the Follow-On Docs icon ![]() at the bottom of the screen. Double click the Accounting document option in the pop-up screen.
at the bottom of the screen. Double click the Accounting document option in the pop-up screen.
For our example, the check receipt accounting document is displayed below:
Present Checks
Once the checks have been deposited in the bank, clear the check receipt in the SAP FBCJ cash journal. Highlight the row or rows of the checks which have been deposited and click the Present checks icon ![]() at the bottom of the screen. In the clear checks screen, enter the following information:
at the bottom of the screen. In the clear checks screen, enter the following information:
- Select business transaction related to payment to bank
- Enter G/L account or allow it to be defaulted from the business transaction
Hit the Post lot button ![]() .
.
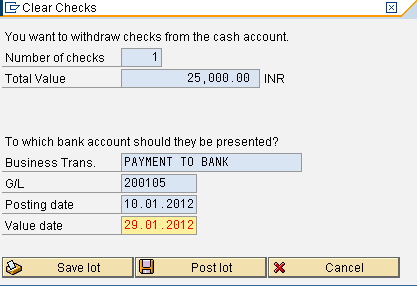
A new row is formed in the Check receipts tab representing the payment to the bank. This amount deducts from the total check receipts balance, as the check is no longer in possession.
—
Did you like this tutorial? Have any questions or comments? We would love to hear your feedback in the comments section below. It’d be a big help for us, and hopefully it’s something we can address for you in improvement of our free SAP FI tutorials.
Navigation Links
Go to next lesson: SAP Special G/L Introduction
Go to previous lesson: SAP Cash Journal Configuration
Go to overview of the course: SAP FI Training
Nice blog
nicely presented
dears,
i have a question regarding the checks receipt , after clearing the check how to clear the customer open items automatedly?
Very well explained.
Amazing & effective blog for SAP FICO consultant
How to create Cash Journal four digit number ?
Please explain…!
Regards,
Ravinder Yadav
it is nothing but business place
We are going to start SAP HANA S/4 in our company. I am keeping Petty Cash and I have to post petty cash entries. I have two Queries.
1) How can we post compound entry in FBCJ ?
2) How can we post “Payment to Vendor” if it is a Tax Invoice ?
hope you have got my questions
Thanks & regards
Safdar
A long way, you can finish step by step, and then you can’t reach without a foot
How you solved Profitcenter issue when presenting checks
how i can edit the receipt text entry posted
Really good blog,thank so much for your effort in writing the posts.
Dear Sir,
We want to download cashbook for whom we have made the payment.
Kindly helps us in this regard
i want to know how to closed cash imprest in fbcj
what brings difference between daily Closing and opening cash balances in cash journal
I have a problem that I am unable to present the cheque due to cheque withdrawal saved, pls.tell me sir how can I present that cheque which is in “Cheque withdrawal Saved Status”
Regards,
Srinivas